
The jellyfish haircut ideas has taken over salons and social feeds for one simple reason: it looks dramatic but stays easy to wear. This cut pairs a short, rounded top layer with longer strands underneath, creating a soft silhouette that moves like a jellyfish swimming through water. It works on straight hair, curly hair, thick hair, and fine hair alike. Whether you want a bold change or a small update to your current style, this list gives you real options you can bring to your stylist or even try at home. Each idea below comes with a simple tip so you can get the look without spending a fortune. If you’re also exploring Gypsy Shag Hairstyle Ideas, the soft layers, textured movement, and effortless volume of this classic shag-inspired cut can create a relaxed, stylish look that works beautifully across different hair types and lengths.
1. Classic Blunt Jellyfish Bob

This is the cut that started the trend. The top layer sits short and round, almost like a bowl, while the bottom layer hangs several inches longer. The contrast between the two lengths gives the style its signature shape. It works best on straight or slightly wavy hair since blunt lines show up clearly. If you want to try this at home first, use hair clips to section off the top layer and see how the shape sits on your face before you commit at the salon. A flat iron with a small round brush can help you test the look for a day. Ask your stylist for point cutting at the ends so the blunt line does not look too harsh. This cut suits round, oval, and heart shaped faces the most. Keep trims every eight weeks to hold the sharp contrast. For a budget option, many local salons offer this as a basic bob service, so you do not need a specialty stylist. Add a few drops of lightweight oil to the ends for shine without weighing the top layer down.
2. Wavy Beach Jellyfish Cut

This version softens the sharp lines of the classic cut with loose waves. The rounded top layer gets textured ends instead of blunt ones, and the longer bottom layer flows into soft beach waves. It gives a relaxed, sun-washed feel that pairs well with warm weather. You can create this texture at home with a one-inch curling wand, alternating the curl direction for a natural look. Spray a texturizing sea salt spray before curling to hold the wave longer. This cut works well for medium to thick hair since the waves add body without extra product. For a budget-friendly version, skip the curling wand and braid damp hair overnight, then unravel in the morning for soft waves. Ask your stylist for razor cutting on the ends instead of scissors, since razor cuts create natural texture that blends with waves. This style is forgiving for growing-out bangs too, since waves hide uneven pieces. Trim every ten to twelve weeks to keep the shape without cutting off length you are growing out.
3. Curly Jellyfish Shag

Curly hair takes to this cut in a way that looks full and bouncy. The stylist cuts the top layer shorter so curls spring up and frame the face, while the underneath layer stays long enough to add weight and reduce frizz. This shape gives natural curls more definition without chemical treatment. At home, apply a curl cream on wet hair and scrunch upward to encourage the curl pattern. Avoid brushing dry curls, since this breaks the clumps and causes frizz. Ask your stylist to cut curly hair dry, not wet, since curls shrink up when they dry and the stylist needs to see the true shape. This cut suits type 2 and type 3 curl patterns the most. A microfiber towel or old cotton t-shirt works better than a regular towel for drying curls without frizz, and it costs nothing extra. Deep condition once a week to keep curls soft and bouncy. Trim every ten weeks to remove split ends without losing curl volume.
4. Short Pixie Jellyfish Blend

This is a shorter take on the trend for anyone who wants a bold change. The top and sides get cut close to the head, while a small section at the back stays longer to keep the jellyfish silhouette. It gives you the low-maintenance benefit of a pixie with a small design twist. This cut works well for fine hair since shorter layers add fullness. At home, use a matte styling paste on dry hair to add texture without shine. Ask your stylist to leave the nape section slightly longer than the rest so the jellyfish shape stays visible even in a short cut. This style needs trims every four to six weeks to keep its shape sharp. A budget tip is to stretch out trims by using a small trimmer at home for neck and side cleanup between salon visits. This cut suits oval and heart shaped faces well since it draws attention upward. Add a small amount of pomade to define pieces around the face for a polished finish.
5. Long Layered Jellyfish Cut

If you love long hair but want some shape, this version keeps most of your length. The top layer only gets a small trim to create the rounded silhouette, while the rest of your hair stays long and full. This is a gentle way to try the trend without a dramatic cut. At home, you can test the look with a temporary clip-in topper to see how shorter top layers would frame your face. Ask your stylist for face-framing layers around the front to soften the transition between short and long sections. This cut works for straight, wavy, and loosely curled hair types. Budget tip: request this as an add-on to a regular trim appointment instead of a separate specialty service, since it uses the same length you already have. Use a wide-tooth comb on wet hair to avoid pulling out the layered sections. This style holds its shape for up to twelve weeks between cuts, making it a low-maintenance choice for long hair lovers.
6. Jellyfish Cut With Curtain Bangs

Curtain bangs split down the middle and sweep to each side, framing the face softly. Paired with the rounded jellyfish layers, this combination gives a face-framing effect from both the front and the sides. It works on almost every face shape since the bangs are adjustable in length and width. At home, you can trim curtain bangs yourself with sharp scissors by cutting small sections at a time while the hair is dry. Use a round brush and blow dryer to curve the bang pieces away from your face for a salon-style finish. Ask your stylist to keep the bangs long enough to tuck behind your ears on days you want them out of your face. This style suits people who want bangs but are not ready for a full fringe commitment. A budget tip is to grow out old bangs into this shape instead of starting over, since curtain bangs work with various lengths. Touch up bang trims every four weeks at home to avoid extra salon visits.
7. Asymmetrical Jellyfish Style
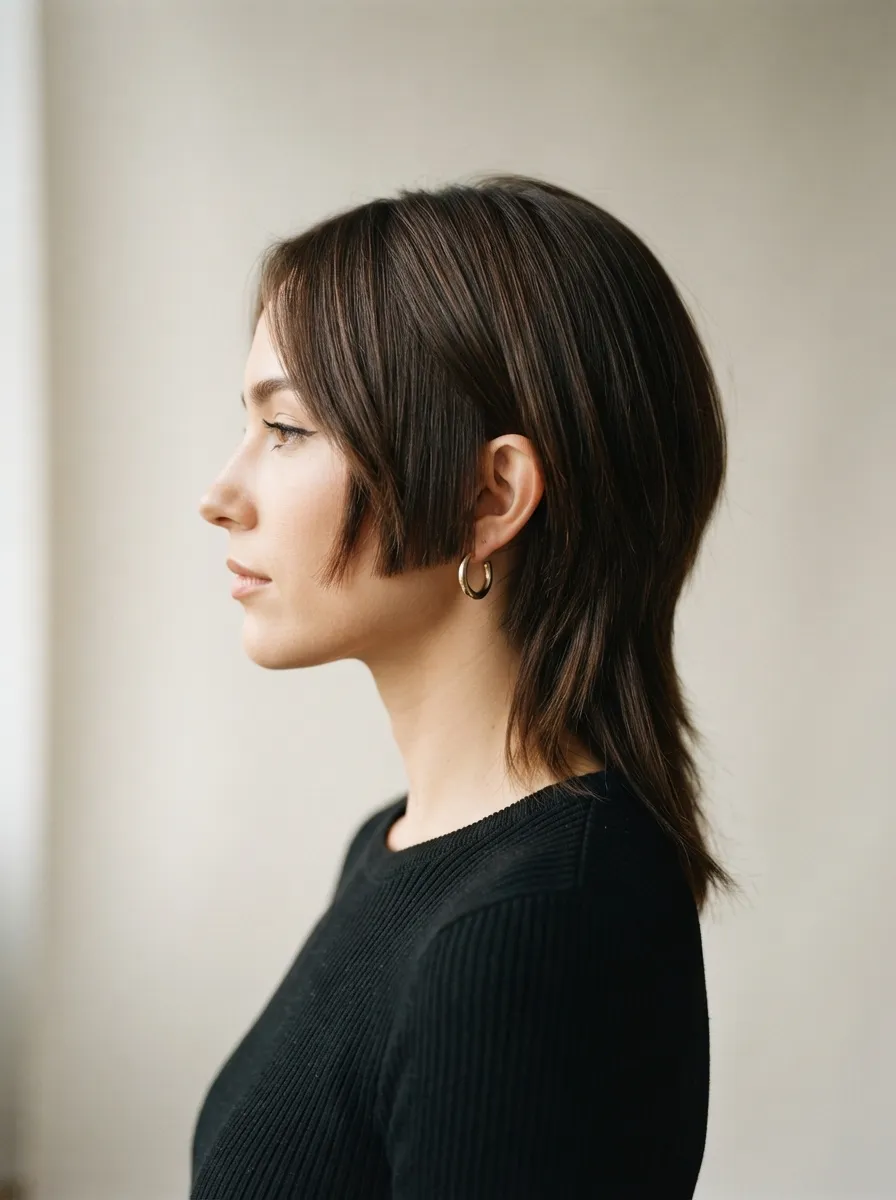
This version breaks the usual symmetry by cutting one side shorter than the other. The rounded top layer angles diagonally across the head, giving a modern, edgy feel. It works best for people who already have some layers and want a bold update rather than a small change. At home, part your hair on the opposite side occasionally to see how the asymmetry catches the light differently. Ask your stylist to use weight lines to control how sharp the angle looks, since a soft weight line blends better for everyday wear. This cut suits square and diamond shaped faces particularly well, since the angle softens strong jawlines. A budget-friendly approach is to start with a small asymmetry, just an inch difference between sides, and grow into a bolder angle over a few appointments. Style with a flat iron for a sleek look, or scrunch with a texture spray for a more undone finish. Trim every six weeks to maintain the sharp angle.
8. Jellyfish Cut For Fine Hair

Fine hair benefits from this cut because the shorter top layer adds instant volume at the crown. The longer underneath layer keeps enough weight to avoid a flat, thin look. This combination tricks the eye into seeing fuller hair without any extensions or thickening treatments. At home, blow dry your roots upward with a round brush to boost the volume this cut creates naturally. Use a lightweight mousse instead of heavy creams, since fine hair gets weighed down easily. Ask your stylist to keep layers shorter than usual on top, since fine hair needs shorter pieces to stand up and create lift. This cut works for straight and slightly wavy fine hair the most. A budget tip is to use dry shampoo at the roots before styling, since it adds grip and texture that helps hold volume through the day. Trim every six to eight weeks to prevent thin ends from looking stringy. Avoid heavy oils on the top layer, and save them for the ends only.
9. Jellyfish Cut For Thick Hair

Thick hair often feels heavy and hard to manage, and this cut solves that by removing bulk from the top layer. The rounded shape thins out dense sections near the crown while keeping the length and fullness underneath. This gives thick hair more movement and less weight on the scalp. At home, use a thinning shear only if you have experience, otherwise leave this step to your stylist since it is easy to remove too much at once. Ask for internal layering, which cuts inside the hair rather than at the visible ends, so the shape stays smooth from the outside. This cut suits wavy and curly thick hair especially well since it prevents a triangle shape. A budget tip is to ask for this shaping during a regular haircut instead of a separate deep-layering appointment. Use a leave-in conditioner on the ends to keep them soft, since thick hair needs extra moisture at the tips. Trim every eight to ten weeks to maintain the reduced bulk.
10. Rainbow Colored Jellyfish Cut
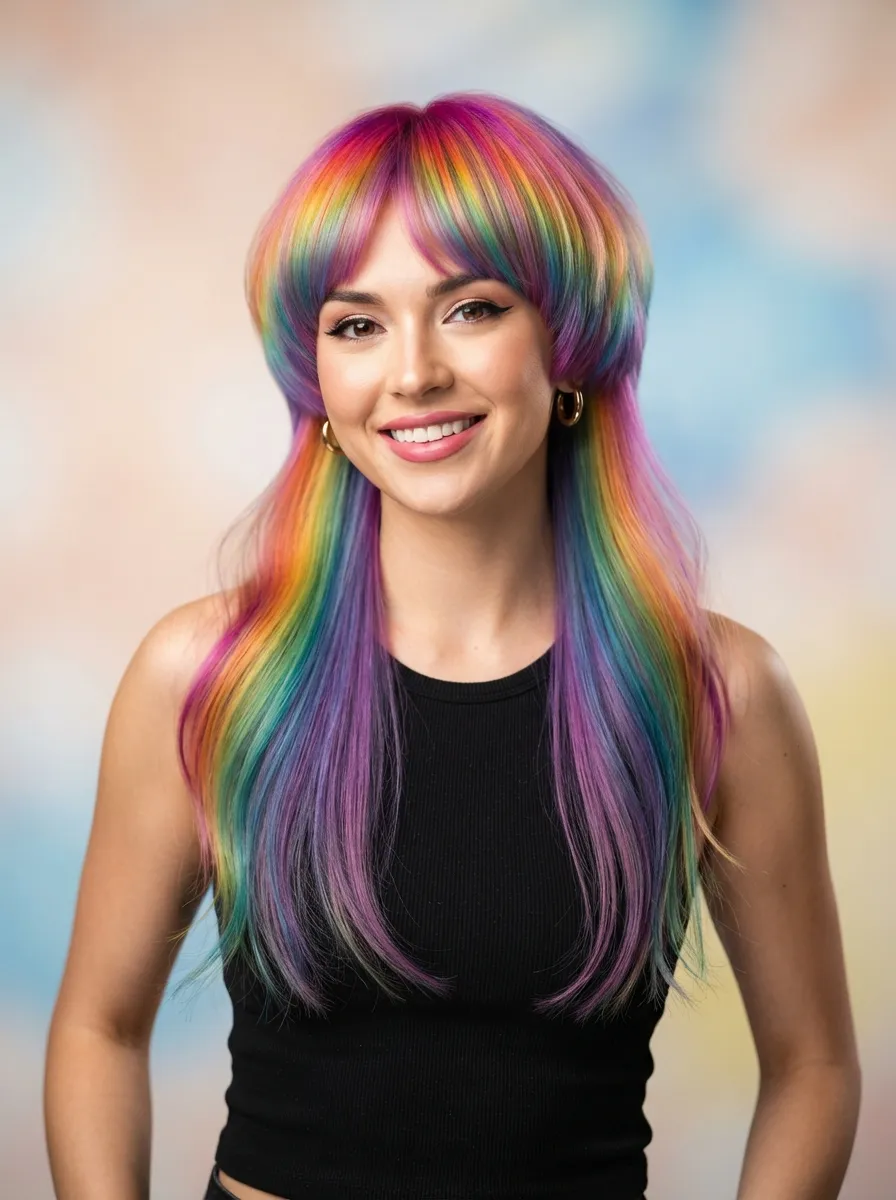
For anyone who wants a bold statement, adding rainbow color to the jellyfish shape makes the layers pop even more. Each color band shows off the different lengths, since the shorter top layer displays one shade while the longer bottom layer reveals another. This is a striking way to make the haircut the center of attention. At home, you can start small with temporary hair chalk or color spray to test how the layers show off multiple shades before committing to permanent color. Ask your colorist about direct dye application, which works well on pre-lightened hair and lasts several weeks with proper care. This cut and color combination works best on those with time to maintain vivid color, since it fades faster than natural shades. A budget tip is to choose two colors instead of a full rainbow, keeping the process shorter and cheaper. Use color-safe shampoo and cool water washes to extend the color between salon visits. Trim every eight weeks to keep both the cut and the color fresh.
11. Balayage Jellyfish Layers

Balayage adds a soft, hand-painted color gradient that highlights the natural movement of this cut. The lighter tones catch the light on the longer bottom layer, while the roots stay closer to your natural shade. This combination gives dimension without heavy maintenance, since balayage grows out softly. At home, use a purple shampoo once a week if your balayage is blonde, to prevent brassy tones between salon visits. Ask your colorist to focus the lightest pieces around the face and the ends, since this draws attention to the jellyfish shape’s longer sections. This cut and color pairing works on brunette, blonde, and red hair bases. A budget tip is to request a partial balayage, which covers fewer sections and costs less than a full head application, while still highlighting the layered shape. Deep condition the ends weekly, since lightened hair dries out faster. This combination can go three to four months between color touch-ups, making it a cost-effective long-term choice.
12. Jellyfish Cut With Micro Bangs

Micro bangs sit high above the eyebrows and pair with the rounded jellyfish layers for a bold, retro-inspired look. This combination works best for people with confidence in showing their full forehead, since micro bangs do not offer much coverage. At home, trim micro bangs in small sections while dry, cutting less than you think you need since short hair looks shorter once it dries and settles. Ask your stylist to point cut the ends of the micro bangs so they do not look like a straight blunt line across the forehead. This style suits oval and long face shapes the most, since the bangs shorten the appearance of the face. A budget tip is to trim these bangs yourself between salon visits, since they grow out quickly and need touch-ups every two to three weeks. Style with a small round brush and blow dryer to curve them slightly away from the forehead. This is a bold choice, so try a clip-in version first if you are unsure.
13. Jellyfish Mullet Hybrid

This combination mixes the rounded jellyfish top with the longer, choppier back sections of a mullet. It gives a rock-inspired edge while keeping the soft, rounded frame around the face. This hybrid style suits anyone who wants a cut with more personality than a standard bob. At home, use a texturizing spray at the back sections to enhance the choppy mullet pieces. Ask your stylist to keep the front rounded layer soft and blended, while cutting the back with sharper, more defined pieces for contrast. This cut works well on straight and wavy hair, since curly hair can hide the mullet’s defined back shape. A budget tip is to ask for this as a creative twist on a regular haircut appointment, since it does not require extra services beyond cutting. Style with a flat iron on the front layer for smoothness, and scrunch the back with a texture cream for definition. Trim every eight weeks to keep the contrast between the two sections sharp.
14. Sleek Straight Jellyfish Cut

For a polished, glass-like finish, this version keeps the hair completely straight and smooth. The rounded top layer and longer bottom layer both get flat-ironed for a sleek, glossy look that shows off the cut’s clean lines. This style works best for naturally straight or slightly wavy hair. At home, use a heat protectant spray before flat ironing to prevent damage, especially if you straighten often. Ask your stylist for a blunt finish on this cut rather than textured ends, since blunt lines show up more clearly when the hair is sleek and straight. This cut suits fine to medium hair types the most, since thick hair takes longer to straighten fully. A budget tip is to invest in one good quality flat iron instead of buying multiple styling tools, since a reliable iron lasts for years with proper care. Finish with a light-hold hairspray to keep flyaways down without weighing the sleek finish down. Trim every eight weeks to keep the blunt lines crisp.
15. Jellyfish Cut For Round Faces

Round faces benefit from a version of this cut that adds length rather than width. The stylist keeps the top layer slightly longer than the classic jellyfish shape and adds layers that angle downward near the jaw and chin. This creates a slimming, elongated effect. At home, part your hair slightly off-center instead of in the middle, since a center part can widen the appearance of a round face. Ask your stylist for layers that hit below the chin, since layers that stop right at the chin can add width instead of length. This cut works on straight, wavy, and curly round-faced clients. A budget tip is to ask for these small adjustments during a normal trim instead of booking a specialty cut, since the changes are subtle but effective. Style with a flat iron pointed slightly outward at the ends to elongate the shape further. Trim every eight to ten weeks to maintain the flattering angles around the face.
16. Jellyfish Cut For Square Faces

Square faces often have strong, angular jawlines, and this cut softens that shape with rounded layers that fall right at or below the jaw. Adding soft side-swept bangs also helps break up a strong forehead line. This combination balances sharp features with soft, flowing layers. At home, avoid blunt, straight-across bangs, since they can emphasize a square jawline. Ask your stylist for soft, wispy layers around the face rather than sharp blunt pieces, since wispy ends soften angular features better. This cut works on straight and wavy square-faced clients especially well. A budget tip is to request these softening layers as part of your usual haircut, since it does not require extra time or cost beyond a standard trim. Style with loose waves using a curling wand to add extra softness around the jaw. Trim every eight weeks to maintain the soft, rounded shape near the face.
17. Textured Jellyfish Bob

This bob version skips the blunt, smooth lines for a choppier, more textured finish. The ends get cut with a razor or texturizing shears to create piece-y, undone layers throughout both the top and bottom sections. This gives a lived-in, effortless feel. At home, apply a small amount of texture paste to dry hair and twist small sections between your fingers to enhance the choppy pieces. Ask your stylist for razor-cut ends instead of scissor-cut ends, since razor cuts naturally create texture without extra styling. This cut works on straight, wavy, and curly hair types, making it one of the more versatile options on this list. A budget tip is to ask your regular stylist to simply texturize your existing bob instead of cutting new length, saving time and money. Scrunch damp hair with a diffuser attachment to enhance natural texture while drying. Trim every eight weeks to keep the choppy ends from growing out into a blunt shape.
18. Jellyfish Cut With Face-Framing Layers

Face-framing layers cut shorter pieces near the cheeks and jaw, drawing attention to the eyes and cheekbones. Paired with the jellyfish shape, this adds a soft, flattering frame that works for almost any face shape. At home, use a small curling iron to curl just the face-framing pieces inward, creating a soft, romantic look for special occasions. Ask your stylist to keep these layers long enough to tuck behind the ear on days when you want a cleaner look. This cut suits round, oval, square, and heart shaped faces, making it one of the safest bold choices for first-time jellyfish cut wearers. A budget tip is to add face-framing layers to your next regular trim instead of scheduling a full restyle, since it only requires cutting a few extra sections. Use a small amount of styling cream to define these pieces without making them look greasy. Trim every eight to ten weeks to keep the framing sharp and fresh.
19. Silver And Gray Jellyfish Cut

Silver and gray tones give this cut a cool, modern edge, whether from natural gray hair or a dyed silver shade. The rounded layers catch light differently in cooler tones, giving the cut a soft, metallic shine. This works for anyone embracing natural gray or choosing a bold color change. At home, use a blue or purple toning shampoo weekly to keep silver tones from turning yellow or brassy. Ask your colorist about toner refreshes, which cost less than a full color service and keep silver tones vibrant between full appointments. This cut and color combination suits medium to thick hair the most, since thinner hair can show gray tones unevenly. A budget tip is to space out full color appointments to every twelve weeks, using toning shampoo at home to maintain the shade in between. Deep condition weekly, since silver dye processes often dry out the hair. Trim every eight weeks to keep the layered shape looking fresh.
20. Jellyfish Cut For Curly Natural Hair

This version respects the natural coil pattern rather than forcing curls into a straight shape. The stylist cuts curls dry, section by section, allowing each coil to spring into its natural place before trimming the rounded top layer. The longer underneath layer adds weight to reduce shrinkage. At home, use the finger coiling method on wet hair with a curl-defining gel to enhance individual coils. Ask your stylist about DevaCut or similar dry-cutting techniques designed specifically for curly and coily hair types. This cut works on all curl patterns, from loose waves to tight coils. A budget tip is to find a stylist who specializes in curly hair cuts, since a correct dry cut lasts longer and needs fewer touch-ups than a wet cut on curly hair. Sleep on a silk or satin pillowcase to reduce frizz and preserve the curl shape overnight. Trim every ten to twelve weeks to maintain healthy curl definition.
21. Undercut Jellyfish Style
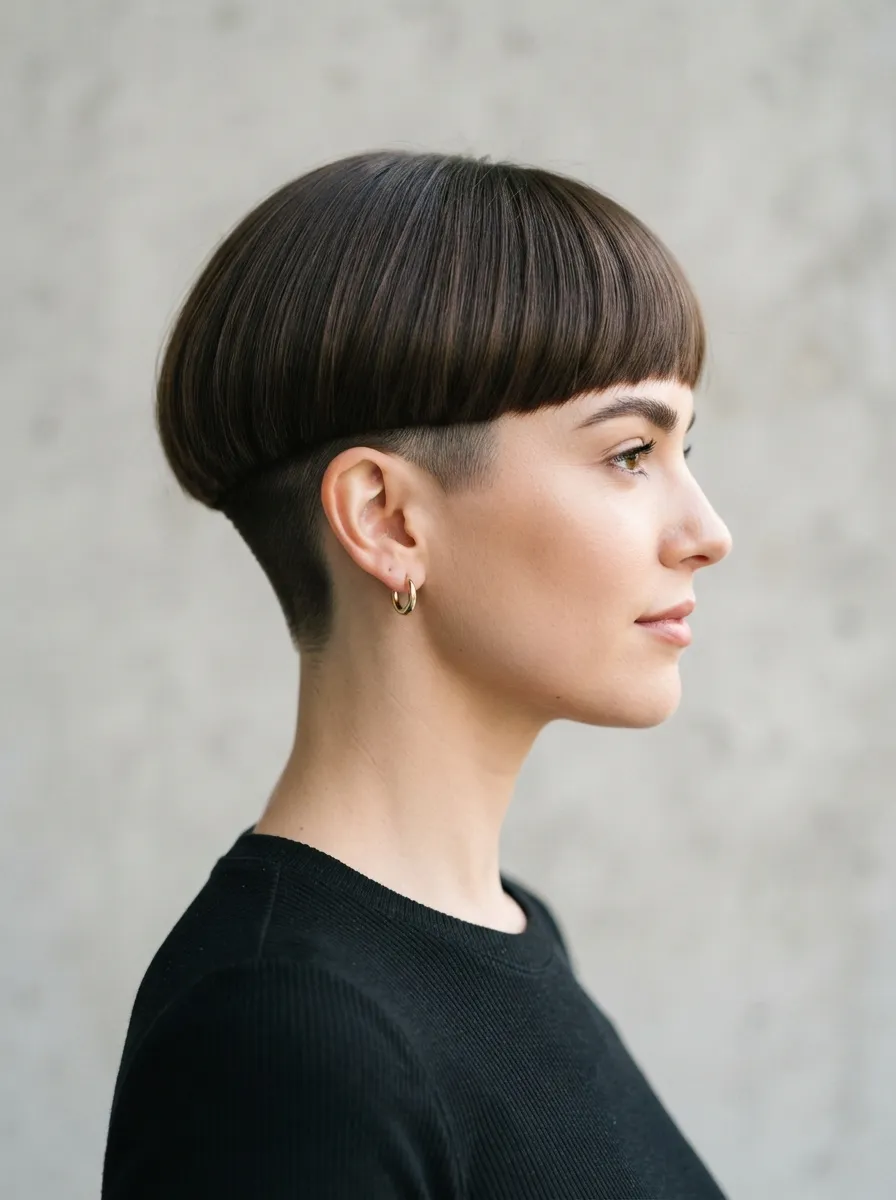
This bold variation shaves or closely crops the underneath section of hair, while the top stays long enough to keep the classic jellyfish shape. When the top hair is worn down, it hides the undercut, but styling it up reveals a completely different, edgier look. This gives you two styles in one haircut. At home, use clips to lift the top section and check how the undercut looks before deciding on styling for the day. Ask your stylist to keep the undercut section higher or lower depending on how easily you want to hide or show it, since a higher undercut is more visible even with hair down. This cut works best on thick or medium hair, since the top layer needs enough weight to cover the shaved section when worn down. A budget tip is to maintain the undercut yourself at home with clippers between salon visits, since this section grows out faster than the rest. Trim the top layer every eight to ten weeks to keep the jellyfish shape balanced.
22. DIY At-Home Jellyfish Trim

If a salon visit is not in the budget right now, you can try a simple version of this cut at home. Start by sectioning your hair into a top layer and a bottom layer using clips, keeping the top section about two to three inches shorter than the bottom. Trim small amounts at a time, since it is easier to cut more later than to fix a section that is too short. Use sharp hair-cutting scissors instead of regular scissors, since dull blades cause split ends and uneven lines. Work in front of two mirrors if possible, so you can check the back and sides as you go. Ask a friend or family member to help with the back section, since this area is hard to see and cut alone. Start conservative with the length difference between layers, and adjust more at your next trim once you see how the shape settles. This budget approach works best as a maintenance trim between professional cuts, not a full first-time restyle. Book a professional appointment for the initial shaping, then maintain it at home going forward.
Conclusion
The jellyfish haircut works because it flexes to fit almost any hair type, face shape, and budget. From a simple blunt bob to a bold undercut or vivid rainbow color, these 22 ideas give you a starting point to bring to your next salon visit or try yourself at home. Pick one version that matches your current hair length and texture, ask your stylist about the specific techniques mentioned above, and keep up with trims every six to twelve weeks to hold the shape. Small budget-friendly choices, like DIY touch-ups, toning shampoo, or requesting these cuts as part of a regular trim, help you get this fashion-forward look without a big cost. Whichever version you choose, this cut gives your hair a shape that feels current, wearable, and easy to style.
Leave a Reply