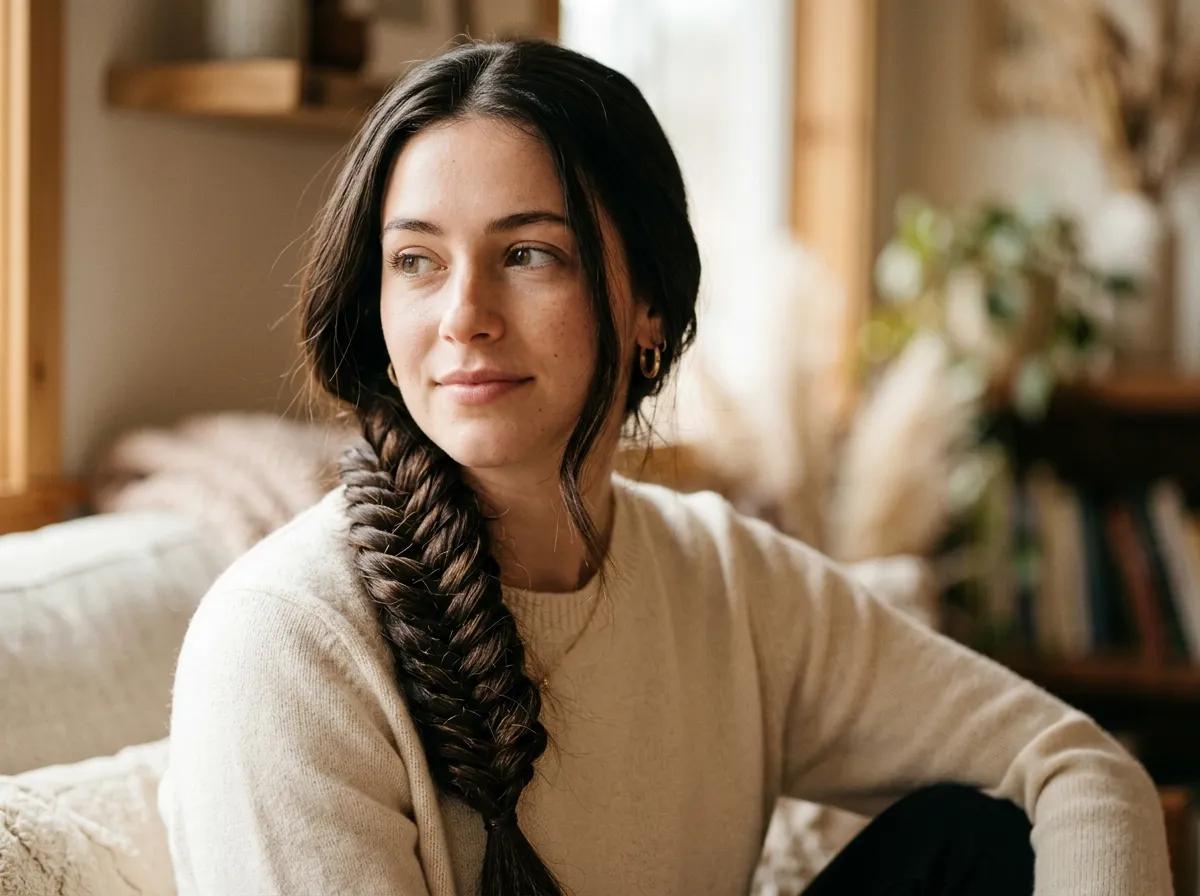
Braids have been one of the most enduring and loved hairstyles across cultures, generations, and hair types. Whether you are running errands, heading to a wedding, or sitting through back-to-back meetings, there is a braid style that fits your day perfectly.
Braids have been one of the most enduring and loved hairstyles across cultures, generations, and hair types. Whether you are running errands, heading to a wedding, or sitting through back-to-back meetings, there is a braid style that fits your day perfectly. The best part is that most braided hairstyles cost nothing to recreate at home. All you need are a few basic hair tools, some practice, and the right idea to get started. This list covers 25 creative braid hairstyle ideas that work across different hair lengths, textures, and skill levels. From everyday quick styles to elaborate looks for special occasions, every idea here comes with practical tips to help you actually pull it off. If you’re also exploring Valentine Hairstyle Ideas for Black Women, braided styles offer endless possibilities, from romantic braided buns and elegant crown braids to protective knotless braids and heart-inspired designs that combine beauty, versatility, and long-lasting wear for any Valentine’s celebration.
ly. The best part is that most braided hairstyles cost nothing to recreate at home. All you need are a few basic hair tools, some practice, and the right idea to get started. This list covers 25 creative braid hairstyle ideas that work across different hair lengths, textures, and skill levels. From everyday quick styles to elaborate looks for special occasions, every idea here comes with practical tips to help you actually pull it off.
1. Classic Three-Strand Braid Hairstyle Ideas
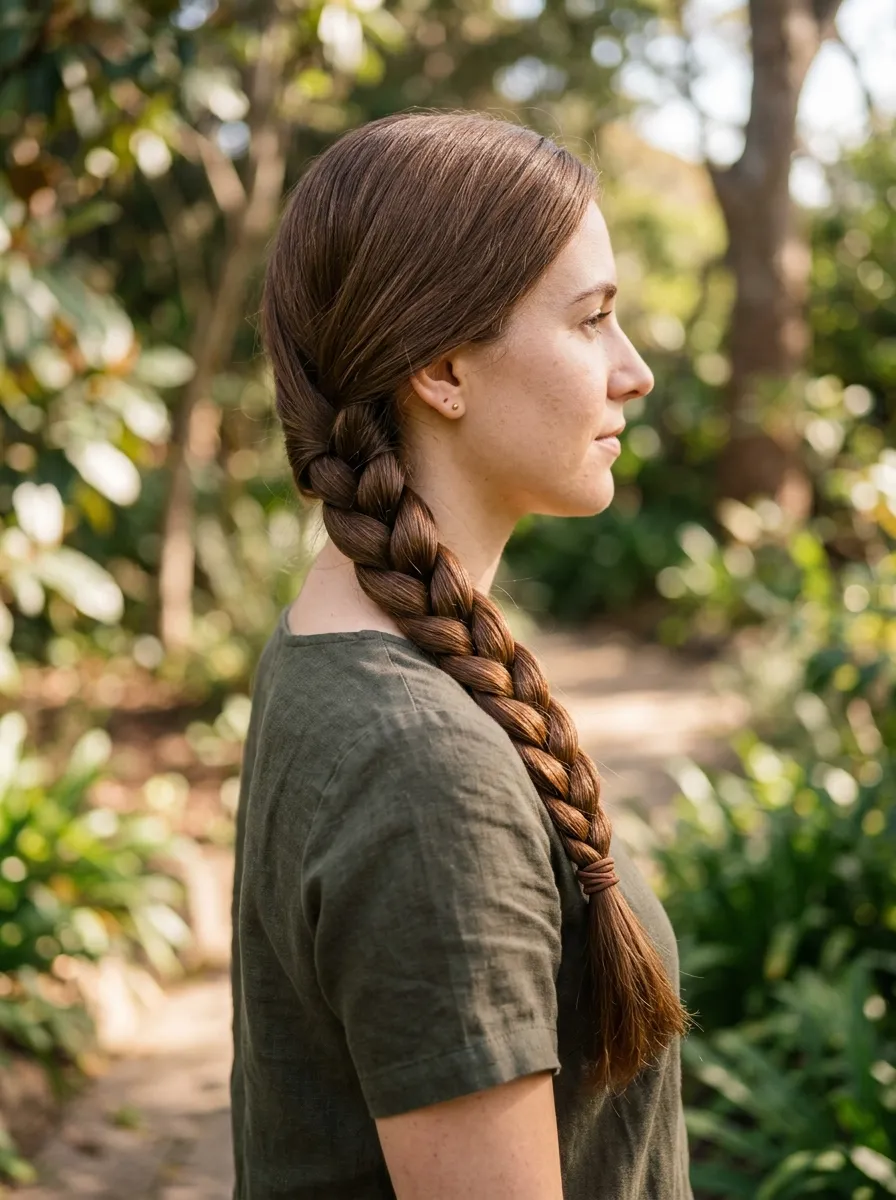
The classic three-strand braid is where every braiding journey starts. It is simple, clean, and works on almost every hair type.
Start by gathering your hair at the nape of your neck or the side of your shoulder. Divide into three equal sections.
Take the right section and cross it over the middle section. Then take the left section and cross it over the new middle. Repeat until you reach the end.
Secure with a small elastic band. For a fuller look, gently tug on the sides of the braid after finishing. This loosens it slightly and adds volume.
A side braid worn over one shoulder looks relaxed and polished at the same time. It works for both casual days and dressed-up events.
Use a small amount of light-hold hair oil or cream before braiding to smooth any flyaways and add shine.
For wavy or curly hair, braid while slightly damp for a smoother result. For straight fine hair, add a texturizing spray first to give the hair something to grip.
This style takes under three minutes once you practice it a few times. It is also the foundation for most other braid styles on this list.
Start here before moving to more complex variations.
2. French Braid Down the Center
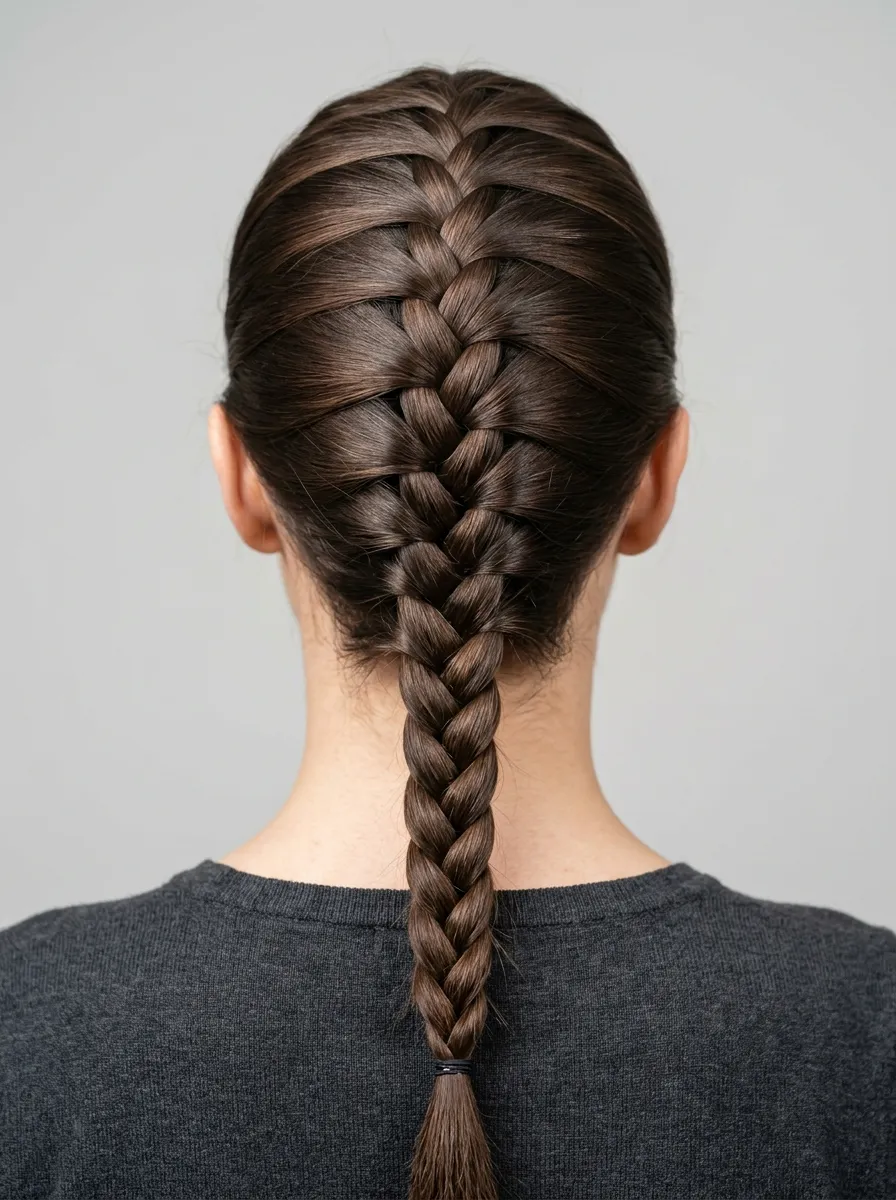
The French braid is one of the most requested braid styles for good reason. It lies flat against the head, looks polished, and keeps hair out of the face all day.
Start at the very top of the head. Gather a small section near the crown and divide it into three strands.
As you braid, add a small piece of hair from each side before crossing each section over the middle. This is what makes it a French braid rather than a standard braid.
Work your way down the head, keeping even tension throughout. The tighter the braid, the longer it will last.
Practice is everything with this style. Your first few attempts may be uneven. That is completely normal. It usually takes five to ten tries before muscle memory kicks in.
Use a fine-tooth comb to part the hair cleanly before you start. A clean center part makes the braid look neat and symmetrical.
This style works best on hair that is at least shoulder length. Very short layers at the front can pop out of the braid. Use small bobby pins to tuck these in.
A French braid can last for two days if set with a light-hold spray. It also looks great slightly loosened on day two for a more relaxed feel.
3. Dutch Braid for a Bold 3D Effect
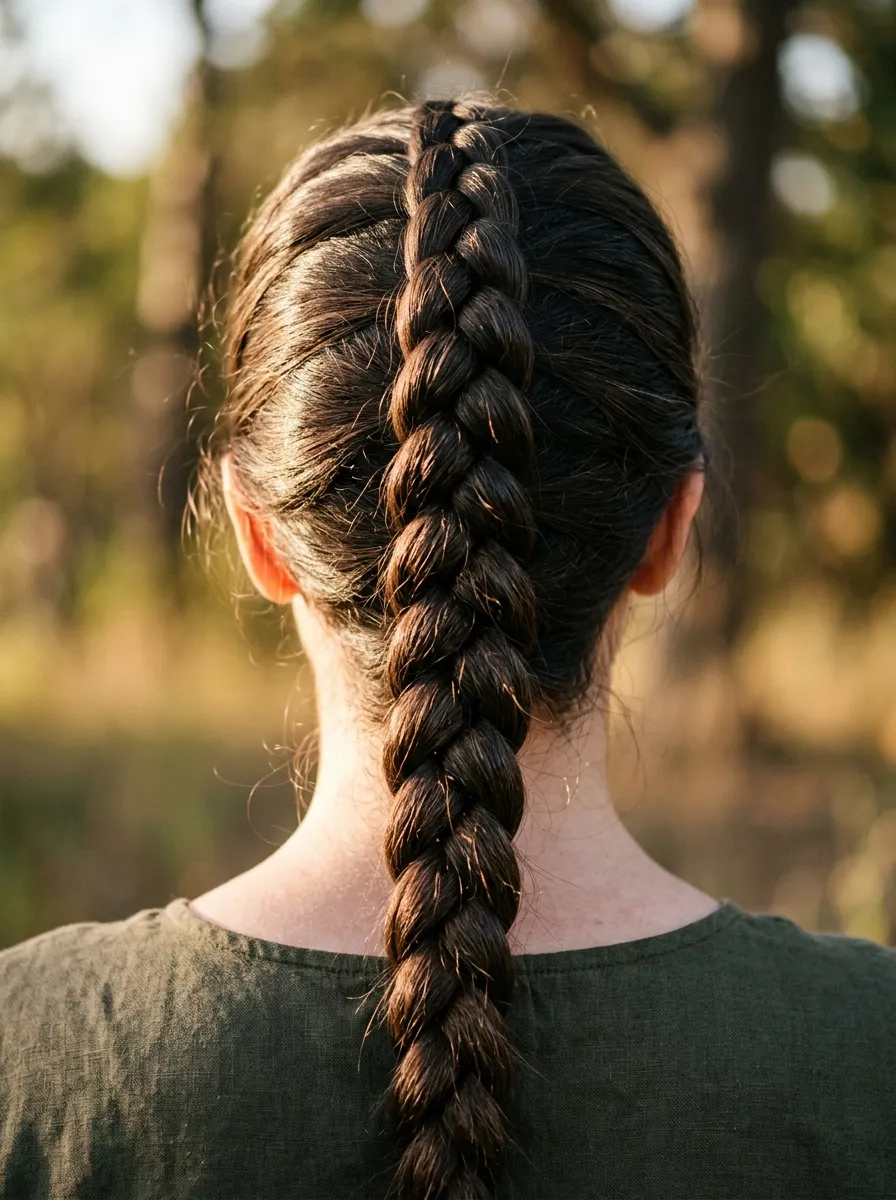
The Dutch braid is the French braid in reverse. Instead of crossing sections over the middle, you cross them under. This simple change creates a braid that sits on top of the hair rather than flat against the scalp.
The visual result is a raised, three-dimensional braid that stands out clearly. It looks bold and deliberate.
Start at the crown and divide into three sections just like a French braid. The only difference is that each outer section crosses under the middle instead of over.
Add hair from each side as you work down the head, just as you would for a French braid. Keep consistent tension so the braid sits evenly.
The Dutch braid works beautifully as a single center braid or as a double braid on each side of the head. Double Dutch braids are one of the most popular athletic and casual styles right now.
Because the braid raises off the scalp, it shows up clearly even in photos. This makes it a popular choice for events, travel photos, and social media looks.
Use a bit of edge control or pomade at the hairline to keep baby hairs smooth and the style looking clean.
This is a great next step after you have mastered the French braid.
4. Fishtail Braid for Effortless Texture
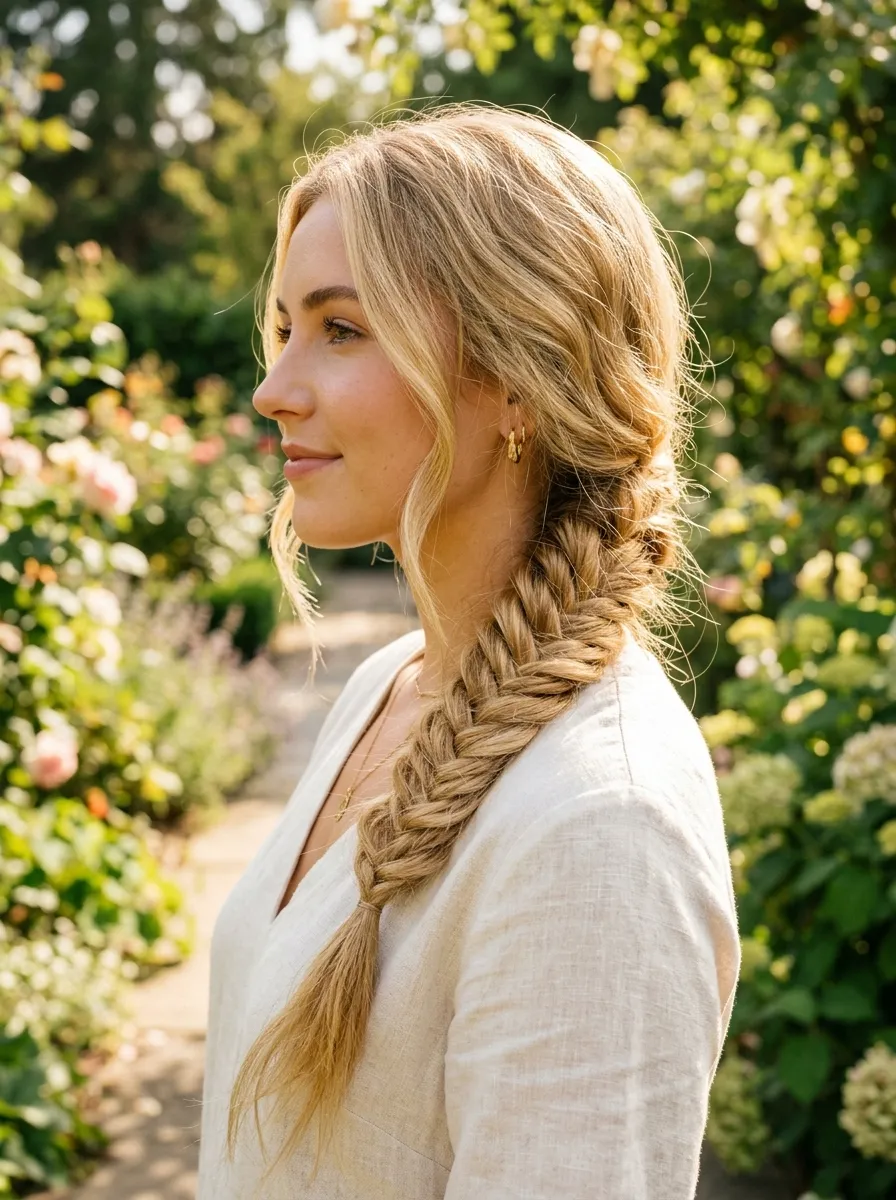
The fishtail braid looks like it takes serious skill. In reality, it only uses two sections instead of three, making it one of the more approachable braid styles once you understand the motion.
Divide your hair into two equal sections. From the outer edge of the right section, take a very thin piece and cross it over to join the left section. Then take a thin piece from the outer edge of the left section and cross it to the right.
Repeat this motion all the way down. The thinner each strand you pull, the finer and more detailed the fishtail pattern will be.
A slightly messy fishtail looks stunning. After finishing, gently pull on the sides to widen and loosen the braid. This creates a full, relaxed texture that photographs beautifully.
The fishtail works best on hair that is at least shoulder length. For very thick hair, splitting the hair into two sections can feel bulky. Work in small, controlled movements.
You can do a fishtail in a ponytail position, over the shoulder, or as a half-up style. All three look different and all three are gorgeous.
Use a dry shampoo or texturizing spray before starting. This adds grip and helps the braid hold its shape throughout the day.
5. Boxer Braids for an Athletic Look
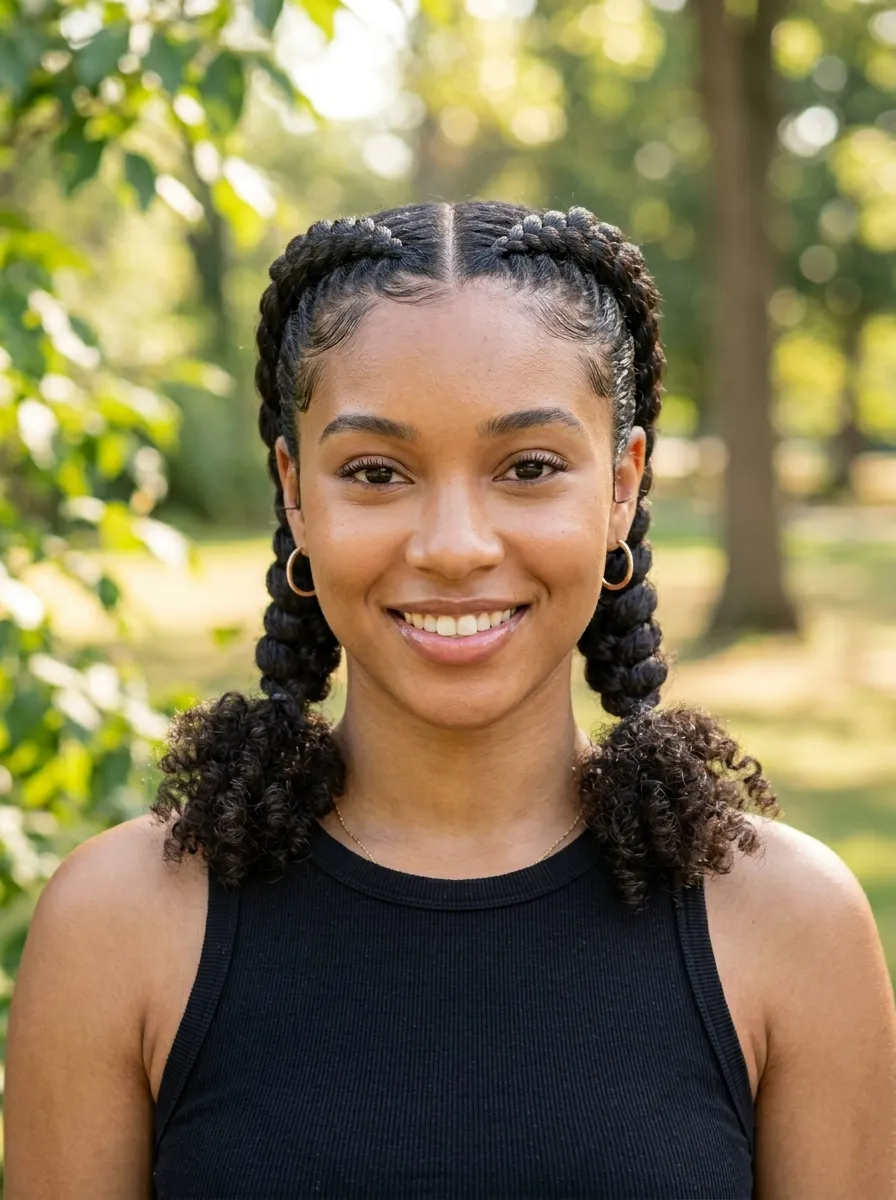
Boxer braids are simply two Dutch braids worn side by side. They sit on either side of a clean center part and run from the hairline to the nape of the neck.
This style became hugely popular as an athletic look because it keeps hair completely secure during intense workouts. It also holds up through heat, humidity, and long days.
Part your hair down the center before you start. Work on one side at a time. Begin a Dutch braid at the front hairline and work toward the back.
Secure each braid with a small elastic at the end. For extra hold, use a light-hold spray once both braids are complete.
Boxer braids look great on all hair textures. For natural or afro-textured hair, twist or braid very slightly damp hair for a smoother result.
This style is one of the most practical protective styles you can do at home without any cost. It keeps ends tucked and reduces breakage from daily manipulation.
Wear them tight for the gym or workplace. Or loosen them slightly and add a few face-framing pieces for a more relaxed casual look.
Boxer braids also work as a prep step. Leave them in overnight and take them out the next morning for beautiful, defined waves with zero heat.
6. Crown Braid for an Elegant Event Look
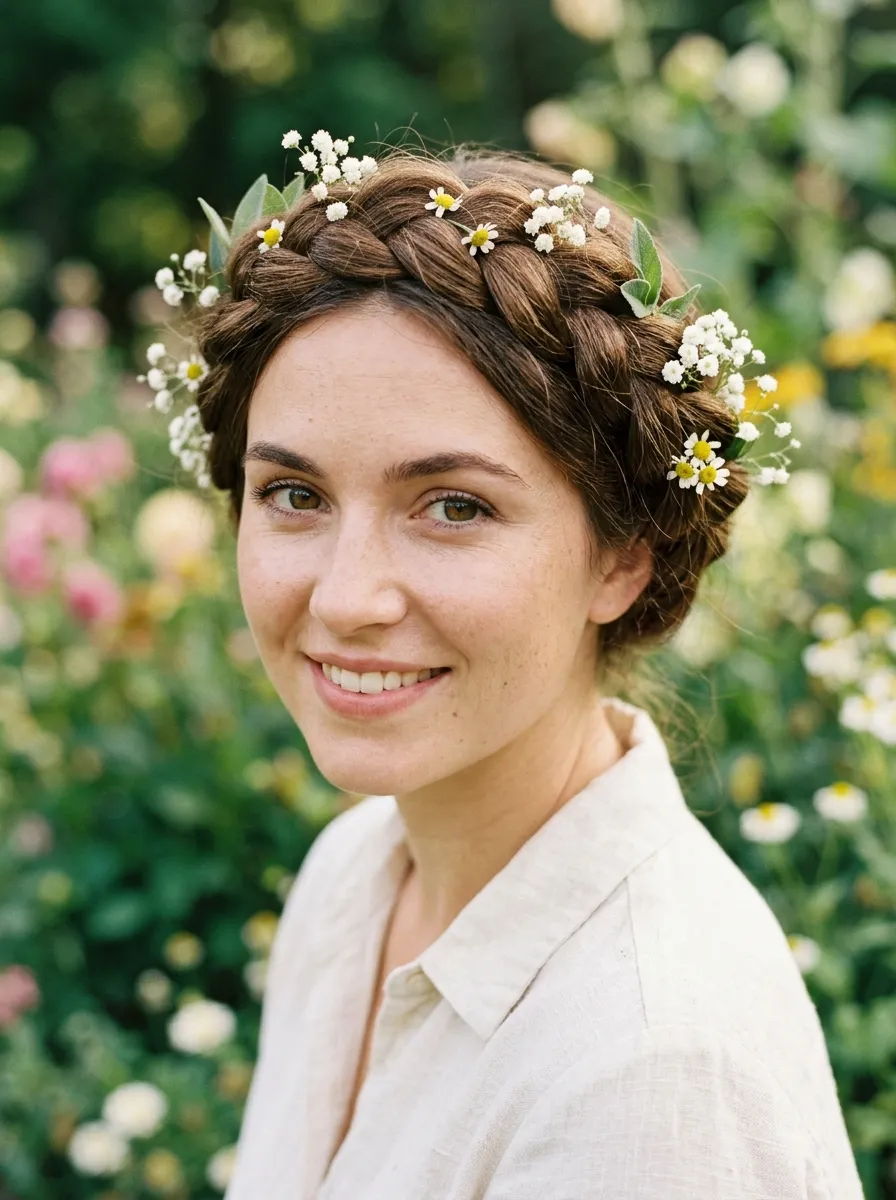
A crown braid wraps around the head in a full circle, sitting like a halo or wreath. It is one of the most elegant braid styles for weddings, formal events, and photo shoots.
You can create it by making two Dutch or French braids and wrapping them across the top of your head, pinning each one flat as you go.
Start by parting the hair down the center. Braid one Dutch braid starting at the nape of the neck on each side. When both braids are complete, bring each one up and across the top of the head in opposite directions.
Pin each braid flat using bobby pins that match your hair color. Tuck the ends under and pin them in place.
For a fuller crown, gently pull and loosen sections of the braid before pinning it across the top.
Add small flowers, pearl pins, or decorative clips to the braid for a special occasion look. This costs nothing extra if you have garden flowers or simple decorative pins.
This style works on medium to long hair. If your hair is shorter, small sections may escape the braid. Use bobby pins generously to tuck everything in.
The crown braid makes any outfit look more polished and intentional. It is worth the extra time it takes to get right.
7. Half-Up Half-Down Braid for Everyday Elegance
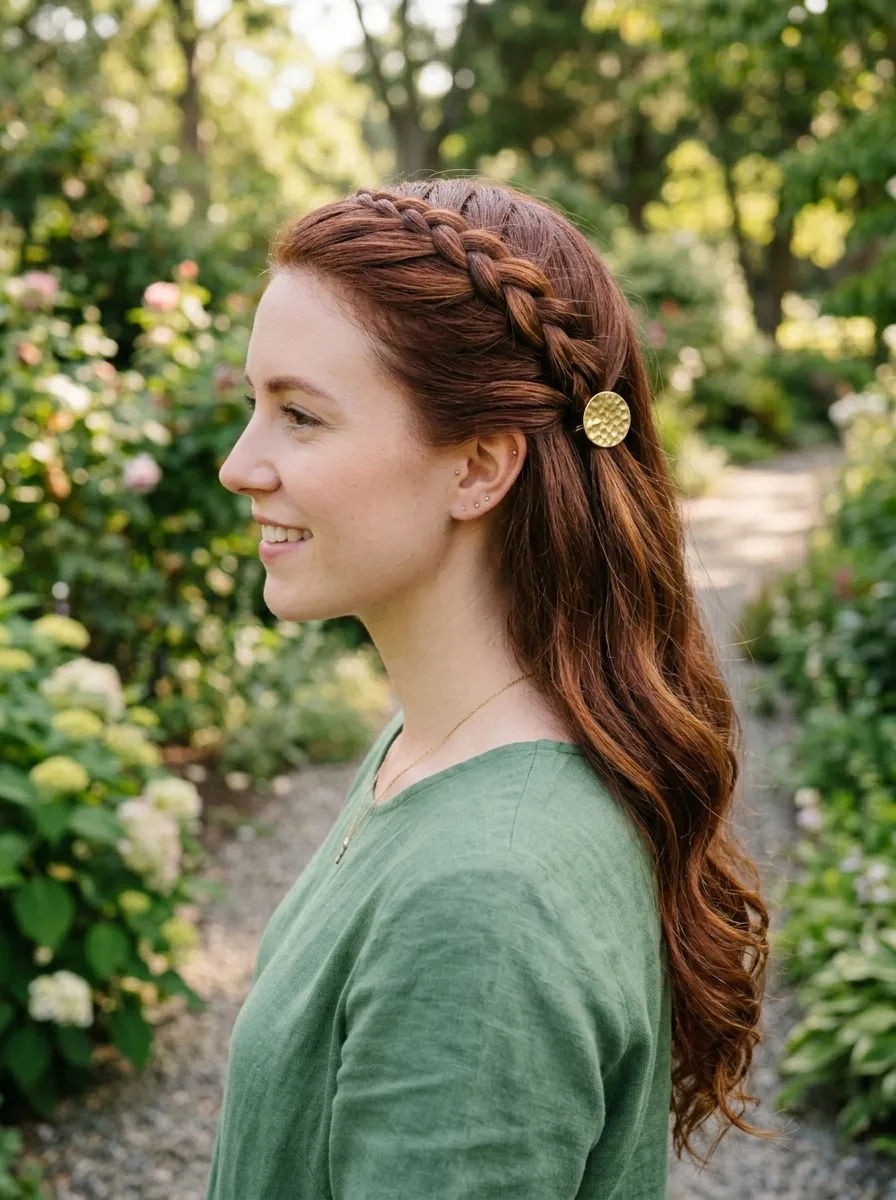
The half-up half-down braid is the perfect everyday style. It keeps hair out of your face while still showing off length and texture.
Gather the top half of your hair from the temples up. Braid this section using a French, Dutch, or simple three-strand braid. Secure with a small elastic or decorative clip.
Leave the rest of the hair down. The combination of braided upper section and loose lower half is effortlessly stylish.
This style works on straight, wavy, and curly hair. For curly hair, the contrast between the neat braid above and the free curls below is especially beautiful.
You can wear it with the braid running straight back from the center, or start the braid to one side for a more asymmetrical, relaxed look.
Add loose waves to the bottom section with a curling wand for a more dressed-up result. This takes an extra ten minutes but completely transforms the look.
A small decorative hair clip instead of an elastic makes the style feel more intentional and put-together. These are widely available at beauty supply stores or online for very little cost.
This is one of the most wearable braid styles because it suits a wide range of occasions from school to work to weekend outings.
8. Waterfall Braid for a Romantic Effect
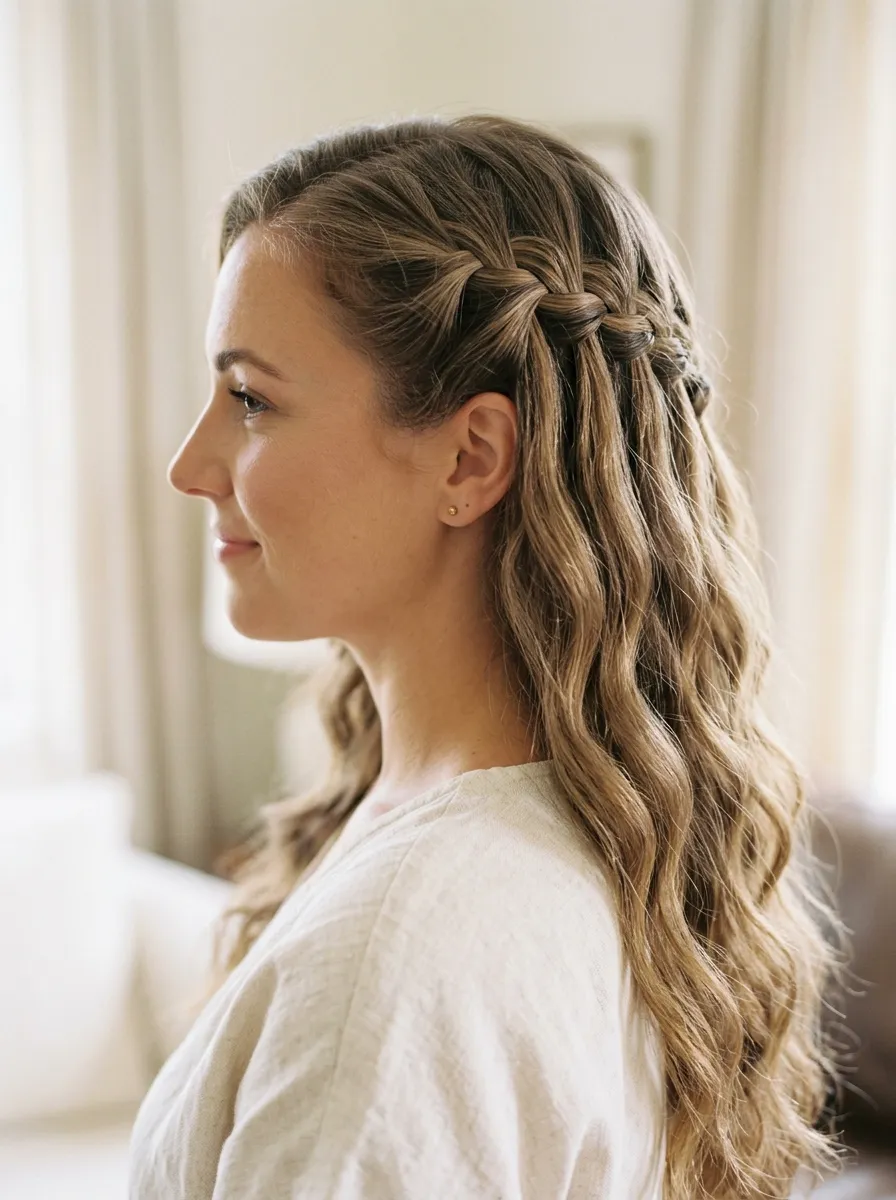
The waterfall braid creates a romantic, flowing effect that looks far more complex than it actually is. Loose strands drop from the braid as if falling through it, creating the waterfall effect.
Start a French braid along one side of the head, beginning near the temple. As you braid, instead of incorporating the dropped strand back into the braid, let it fall freely.
Pick up a new strand of loose hair from above the braid to replace it. Continue this motion across the side of the head.
This creates a trail of loose falling strands that cascade over the rest of your hair. It is beautiful on wavy or curly hair where the loose sections have natural movement.
Finish the braid by securing it with a small elastic or bobby pin behind the ear. Let the rest of the hair fall loose.
Add a few small flowers or decorative pins along the braid for a wedding or event-ready look.
This style suits medium to long hair best. On shorter hair, the cascading sections may be too short to show the effect clearly.
The waterfall braid is one of those styles that looks like salon work but can genuinely be done at home once you practice the motion a few times.
It is especially popular for spring and outdoor events.
9. Messy Braid Bun for a Relaxed Day Look
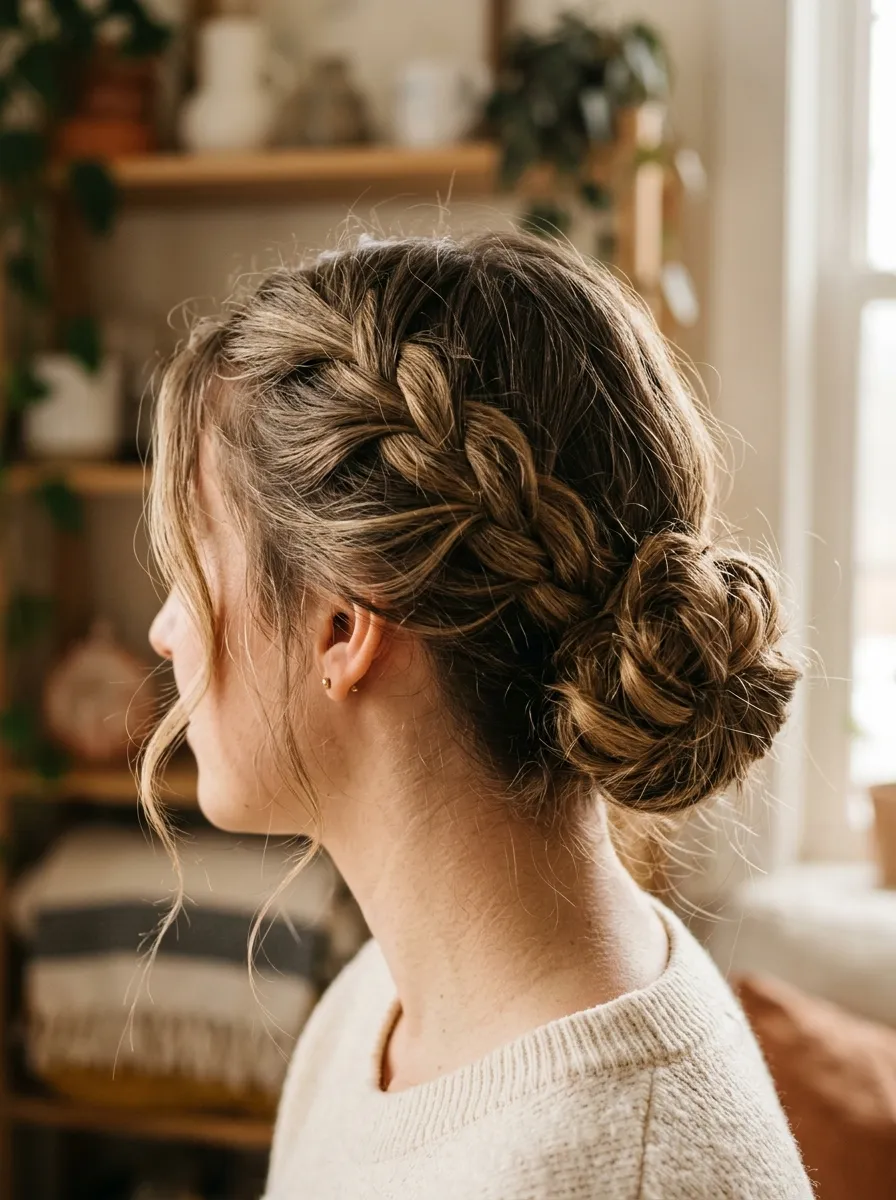
The messy braid bun is the go-to style for days when you want to look put-together without spending much time. It combines the texture of a braid with the practicality of a bun.
Braid your hair loosely in a simple three-strand braid. Do not braid too tightly. The messiness is the point.
When you reach the end, coil the braid into a loose bun at the nape of the neck or the top of your head. Secure with bobby pins and a hair tie.
Gently pull and loosen sections of the braid and bun to create a relaxed, undone look. This step takes thirty seconds and makes a big visual difference.
Leave a few face-framing pieces loose at the front for a soft, romantic effect.
This style works on all hair lengths. For shorter hair, the bun will be smaller. For very long or thick hair, you may need extra pins to secure it.
Day-two or day-three hair actually works better for this style than freshly washed hair. The natural oils and texture give it grip and help it hold.
Use a few bobby pins that match your hair color and they will be virtually invisible in the final look.
This is the style for busy mornings when you want your hair out of the way but still looking intentional.
10. Side Swept Braid for Soft Romance
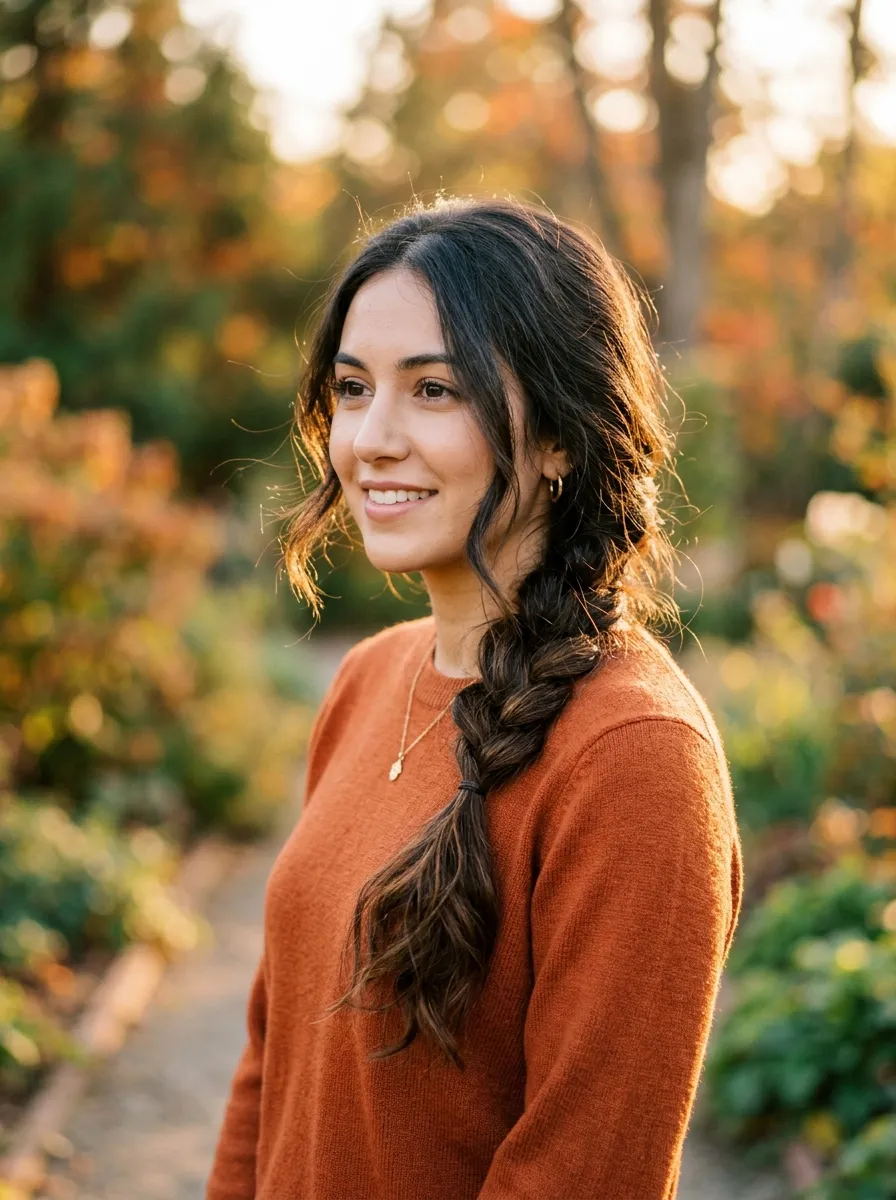
The side swept braid is one of the most flattering braid placements because it draws the eye down and frames the face beautifully. It sits over one shoulder and creates a soft, romantic line.
Gather all your hair to one side. Start a loose French or fishtail braid from behind one ear and work toward the end of the hair.
Tug the braid outward and loosen it gently once you finish. A relaxed braid over the shoulder always looks more elegant than a stiff, tight one.
Leave a few face-framing pieces near the front loose. These soften the overall look.
Use a clear elastic or a small fabric scrunchie to secure the end. A decorative elastic in a metallic finish adds a little detail without any extra effort.
This style works beautifully at weddings, formal dinners, or any event where you want to look polished without a full updo.
For added dimension, use a curling wand on the loose face-framing sections before braiding the rest. The contrast between the braided section and the soft curls is very effective.
The side swept braid suits most face shapes because the swept placement creates an asymmetrical line that flatters naturally.
This is one of those styles that always earns compliments.
11. Braided Ponytail for a Modern Finish
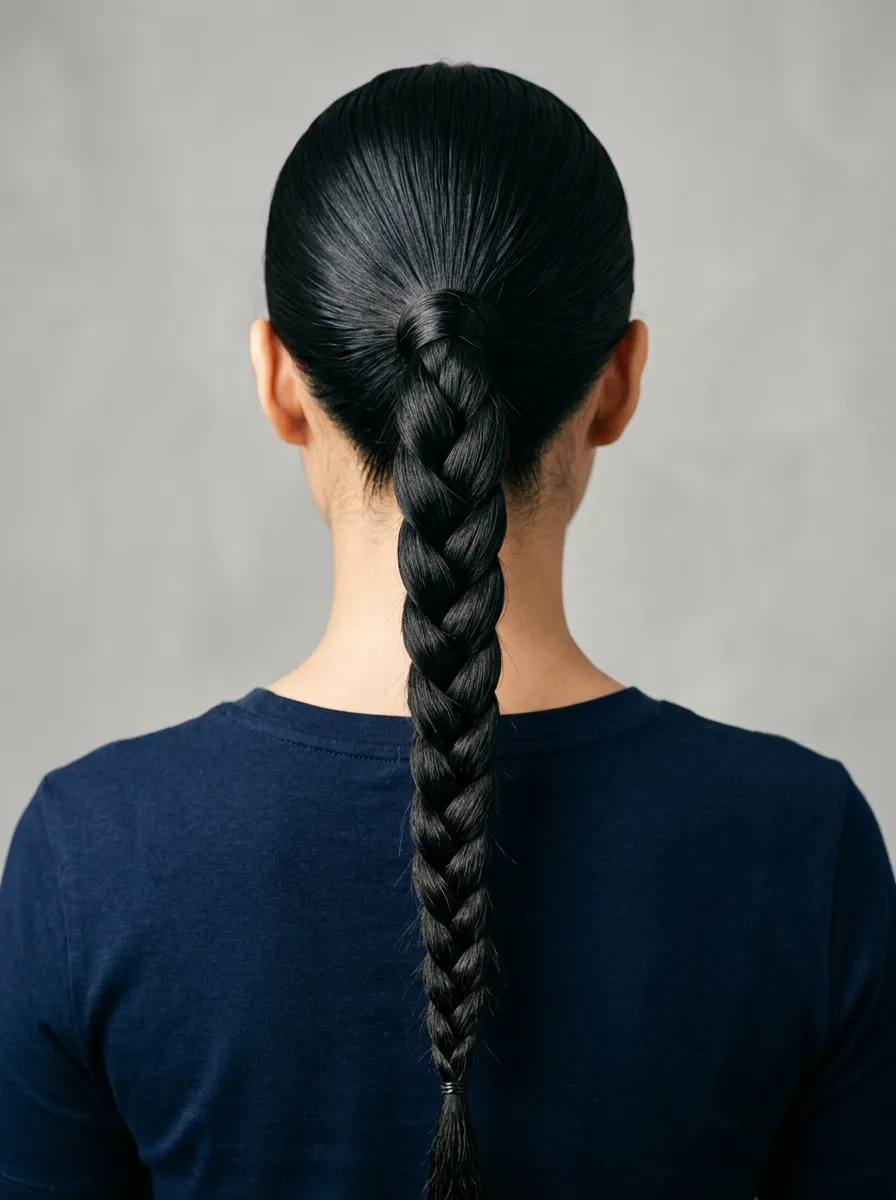
A braided ponytail takes a basic ponytail to the next level without much extra effort. It adds texture and structure to an otherwise simple style.
Pull your hair into a high or low ponytail. Secure it with an elastic. Then braid the ponytail section using a three-strand, fishtail, or Dutch braid.
Wrap a small piece of hair around the elastic to hide it. Secure the wrapped piece with a bobby pin underneath. This one step makes the ponytail look much more polished.
For a sleek result, smooth the top of the ponytail with a fine-tooth comb and a small amount of edge control before braiding.
For a more textured look, let the top be slightly undone and tousle the braid at the end.
This style suits the workplace, the gym, and going out equally well. It just depends on how tight or loose you make it.
Try a low braided ponytail for a softer, more romantic feel. Or keep it high and tight for a modern, athletic look.
Adding a few small accessories like metallic rings or clips along the braid adds personality at almost no cost. Hair rings are available for under $5 at most beauty supply stores.
12. Feed-In Braids for a Clean Protective Style
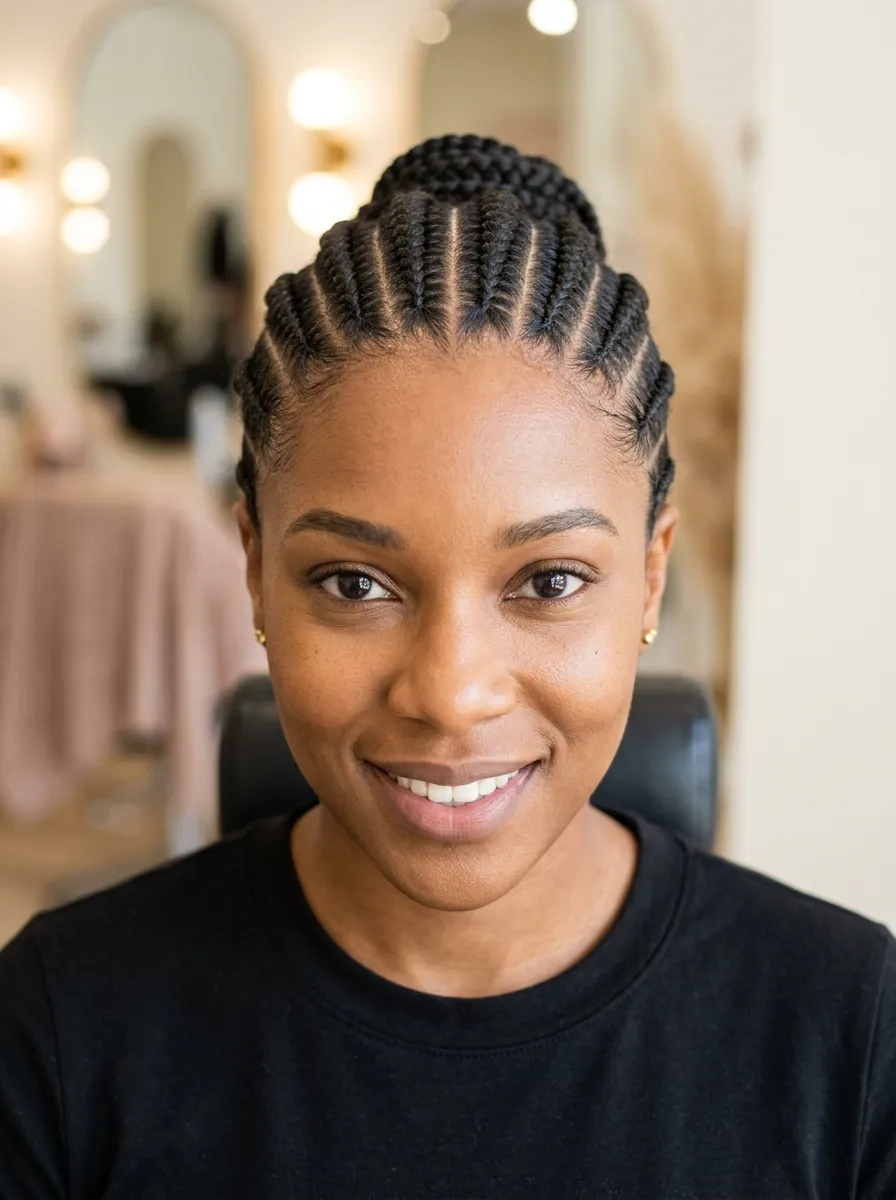
Feed-in braids are a protective braiding technique where you gradually add extra hair as you cornrow, creating a natural, fuller look without bulky knots at the root.
This style is especially popular for afro-textured and natural hair types. It protects the hair from daily manipulation and helps retain length.
Cornrow the hair in straight back or curved rows, adding small pieces of hair from outside the braid as you work toward the ends. This creates a seamless, extended braid.
You can do feed-in braids without extensions if your own hair is thick enough. Or add kanekalon braid hair, which costs very little at beauty supply stores.
The key to clean feed-in braids is consistent tension and evenly sized sections. Take time to part each row cleanly before starting.
Use a rat-tail comb for precise parting. Apply a light braid mousse or edge control along the scalp to keep the style smooth.
Feed-in braids can last two to four weeks with proper care. Sleep with a satin bonnet or pillowcase to protect the style.
This is one of the most practical protective styles available. Done correctly at home, it costs only a few dollars for materials and saves money on salon visits.
13. Boho Braids with Accessories for a Festival Look
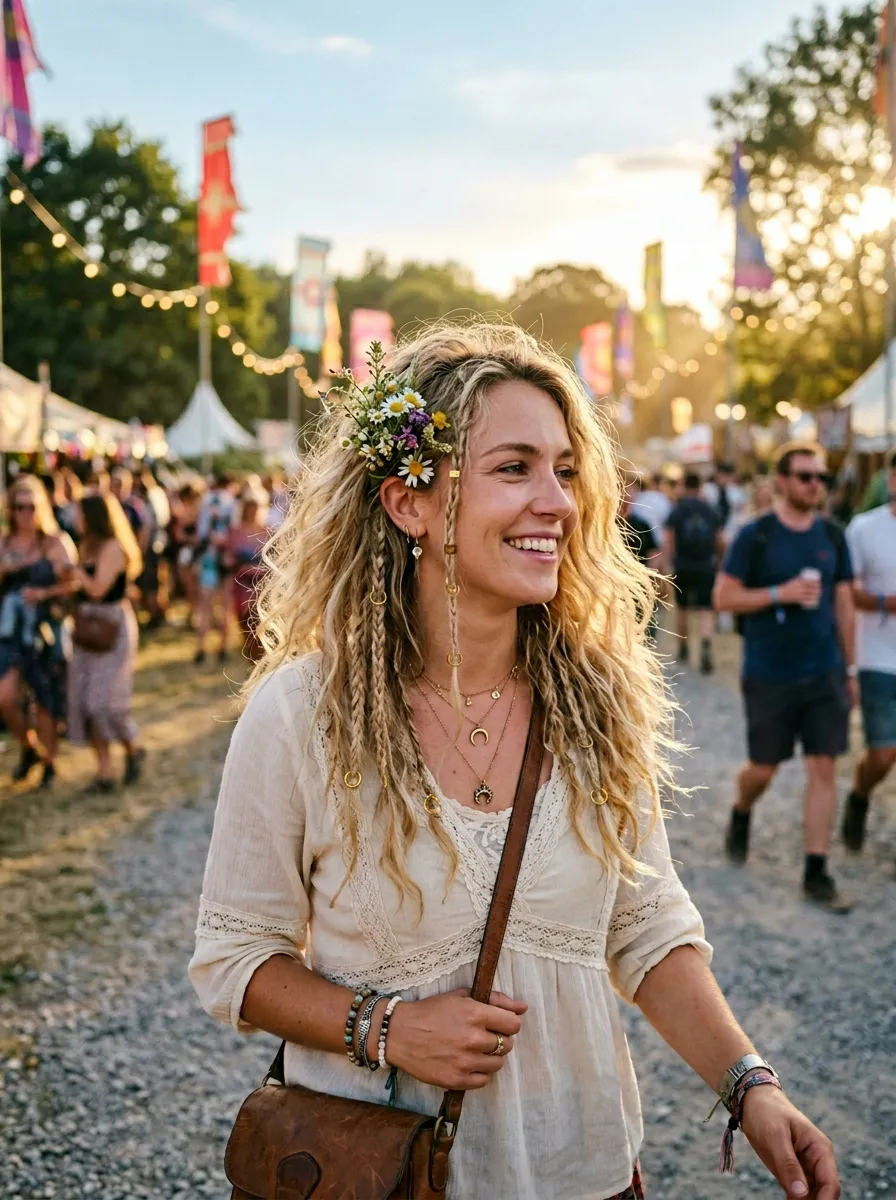
Boho braids mix thin, casual braids throughout loose hair to create a free-spirited, textured look. They are one of the easiest styles to do because perfection is not the goal.
Start with slightly wavy or air-dried hair. Take random small sections throughout your hair and braid each one loosely down to the ends. Secure with a tiny clear elastic.
Thread small metal hair rings or beads onto the braids as you go. These are available for just a few dollars and completely elevate the look without any extra skill.
Tuck small flowers, feathers, or fabric pieces into the braids for an outdoor or festival look. Fresh flowers from your garden cost nothing and look stunning.
The braids do not need to be perfectly placed. Scattered braids at random intervals through loose hair look more natural than perfectly arranged ones.
This style works best on naturally wavy or textured hair. If your hair is very straight, add a few waves with a curling wand first so the braids have movement to sit within.
You can build on this look over several days. Add one or two more small braids each day for a progressively richer texture.
Boho braids are also a great way to make second-day or third-day hair look intentional rather than just worn-in.
14. Lemonade Braids for a Bold Statement
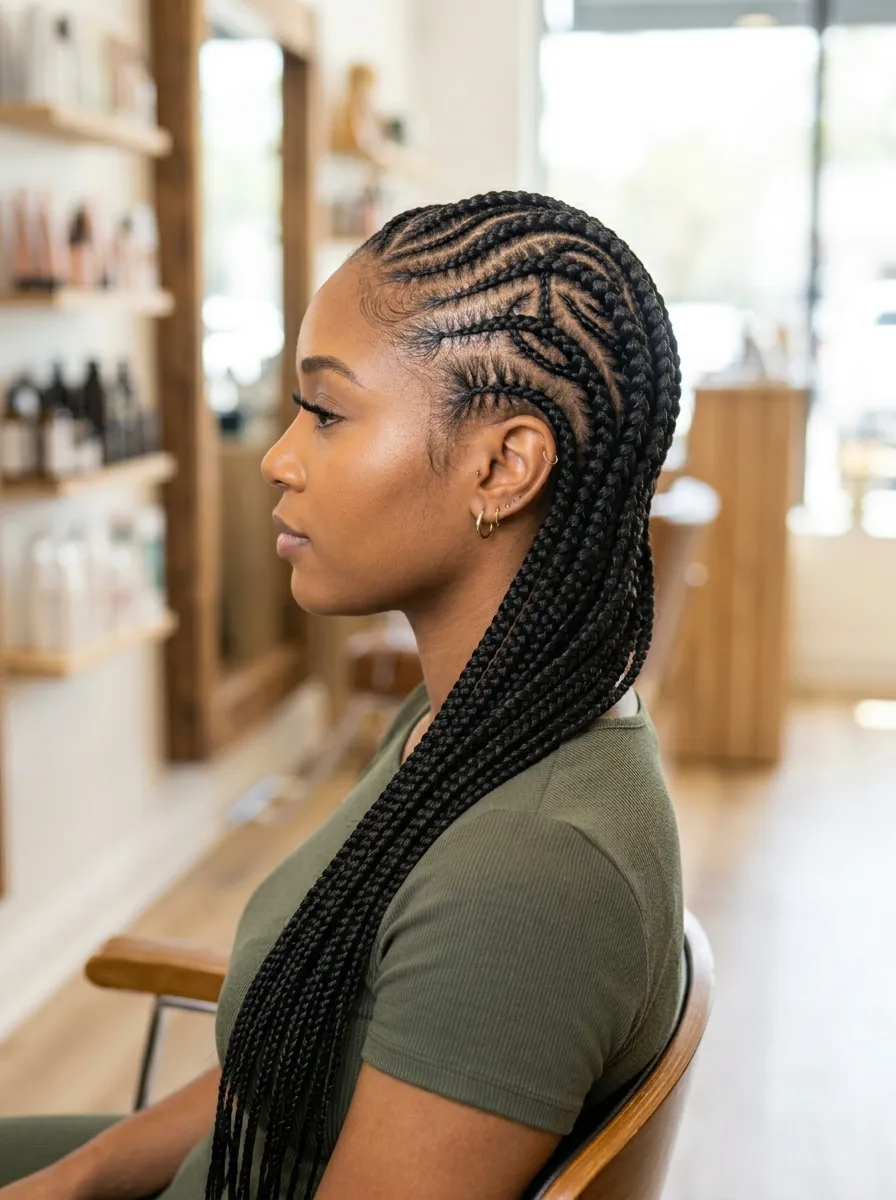
Lemonade braids are side-swept cornrow braids that curve from one side of the head to the other rather than running straight back. The pattern sweeps dramatically to one side.
This style was made famous by Beyoncé and remains one of the most striking braid patterns you can wear.
The key is the curved parting. Use a rat-tail comb to create clean, curved rows that fan from one side of the head. Each row follows the same curve.
This style typically requires extensions to achieve the full flowing length. Kanekalon braid hair is the most widely used and affordable option. One to two packs are usually enough.
If you are not doing this yourself, a professional braider can complete lemonade braids in two to five hours depending on length and size.
For a DIY approach, practice your cornrow technique first on straight-back braids before trying the curved pattern.
Keep the scalp moisturized while the braids are in. Light oil applied along the parts every few days prevents dryness.
Lemonade braids last three to five weeks with proper care. Remove them carefully by cutting the extension hair at the base before unraveling.
This is one of the boldest and most beautiful protective styles available.
15. Micro Braids for Lightweight Protective Styling
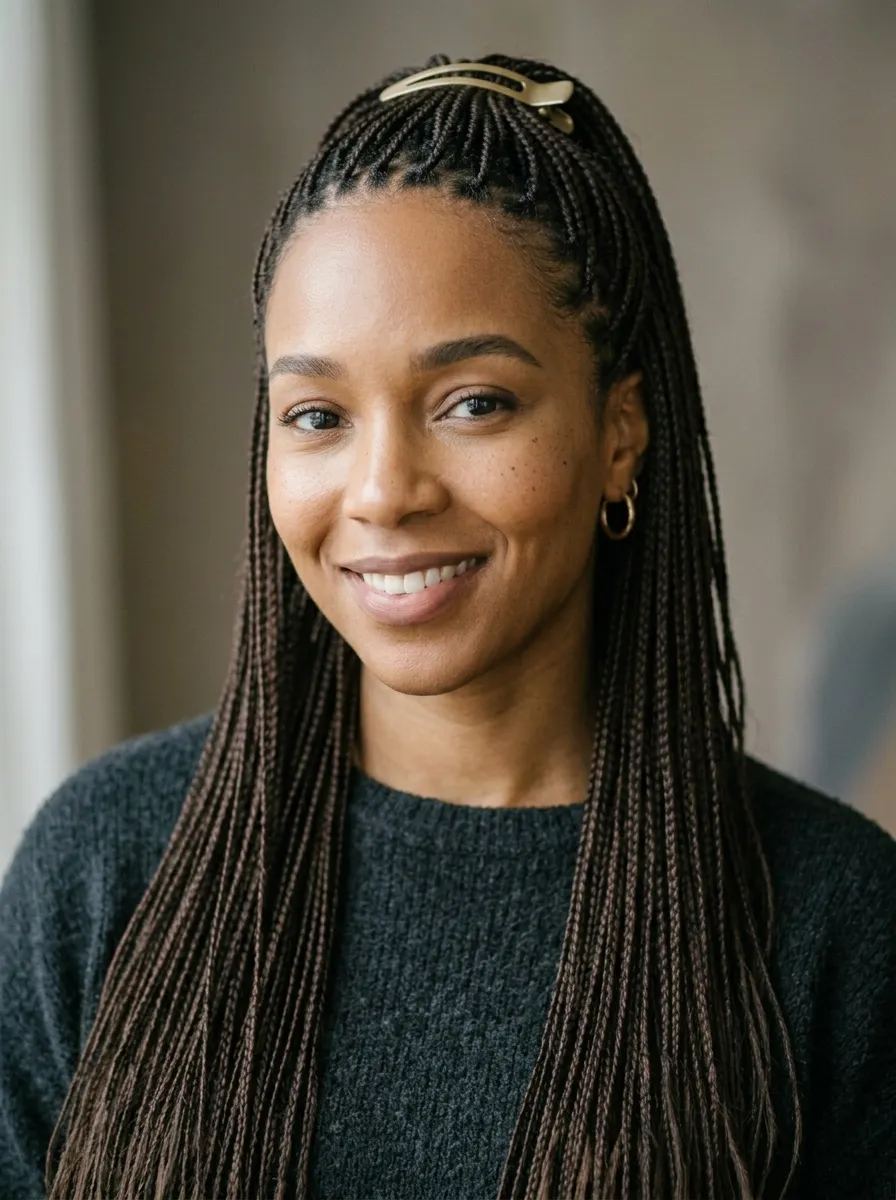
Micro braids are extremely thin individual braids that hang loosely from the scalp. They look like natural hair from a distance but reveal their structure up close.
This style takes several hours to complete because of the sheer number of individual braids involved. But the result lasts weeks and requires very little daily styling.
Part the hair into tiny, uniform sections across the entire head. Braid each section in a three-strand braid down to the ends. Secure with a small elastic or dip in hot water if using extension hair.
You can do micro braids on natural hair without extensions if your hair is long enough. Adding kanekalon hair extends the length and makes the braids more durable.
Micro braids are genuinely protective. They keep the ends tucked and reduce daily manipulation significantly.
Moisturize the scalp regularly while the braids are in. A light spray moisturizer applied every few days is enough.
These braids can be styled in ponytails, buns, or worn loose. This flexibility is one of the biggest advantages of micro braids over other protective styles.
Taking them down is time-consuming. Set aside several hours and work in sections. Use a detangling spray to make the removal process easier and gentler on the hair.
16. Rope Braid for a Textured Twist Look
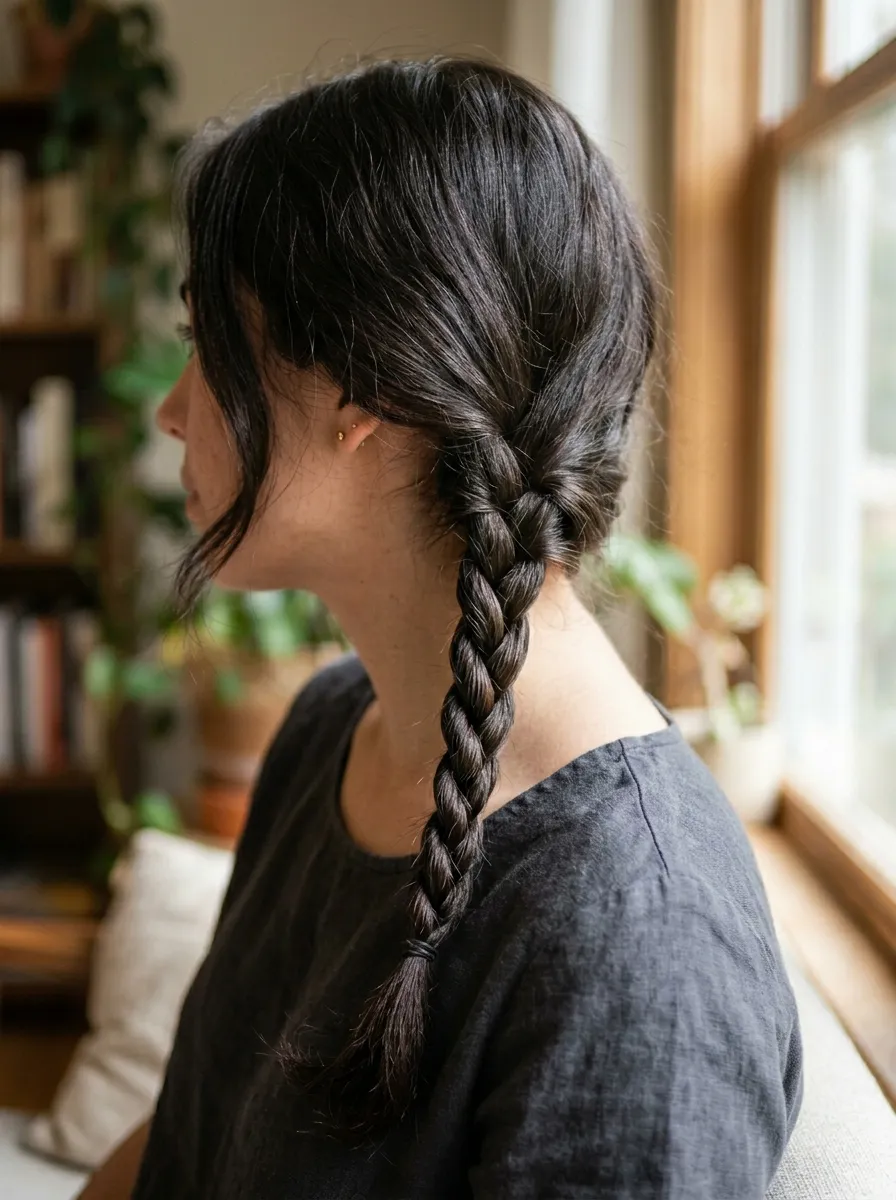
The rope braid uses only two strands instead of three. You twist each strand in one direction, then wrap them around each other in the opposite direction. This creates a tight, rope-like spiral.
Divide your hair into two sections. Twist the right section clockwise. Twist the left section clockwise. Then wrap the two twisted sections around each other counterclockwise.
The opposing directions lock the braid in place. If both twists and the wrap go the same direction, it will unravel.
The rope braid is very quick once you get the motion. It takes about the same time as a regular braid.
It works beautifully as a side braid, a ponytail braid, or combined with other styles. A rope braid ponytail looks especially modern and deliberate.
For a softer look, gently pull the twist apart after finishing to widen it. For a cleaner, tighter look, keep the tension consistent throughout.
This style holds its shape well on second-day hair. The natural oils help the twist stay in place without extra product.
Use a small amount of smoothing serum for a sleek, polished rope braid. Use a texturizing cream for a more relaxed, lived-in look.
The rope braid is one of the most underrated styles in the braiding world. Once you learn it, you will use it constantly.
17. Knotless Box Braids for a Natural Look
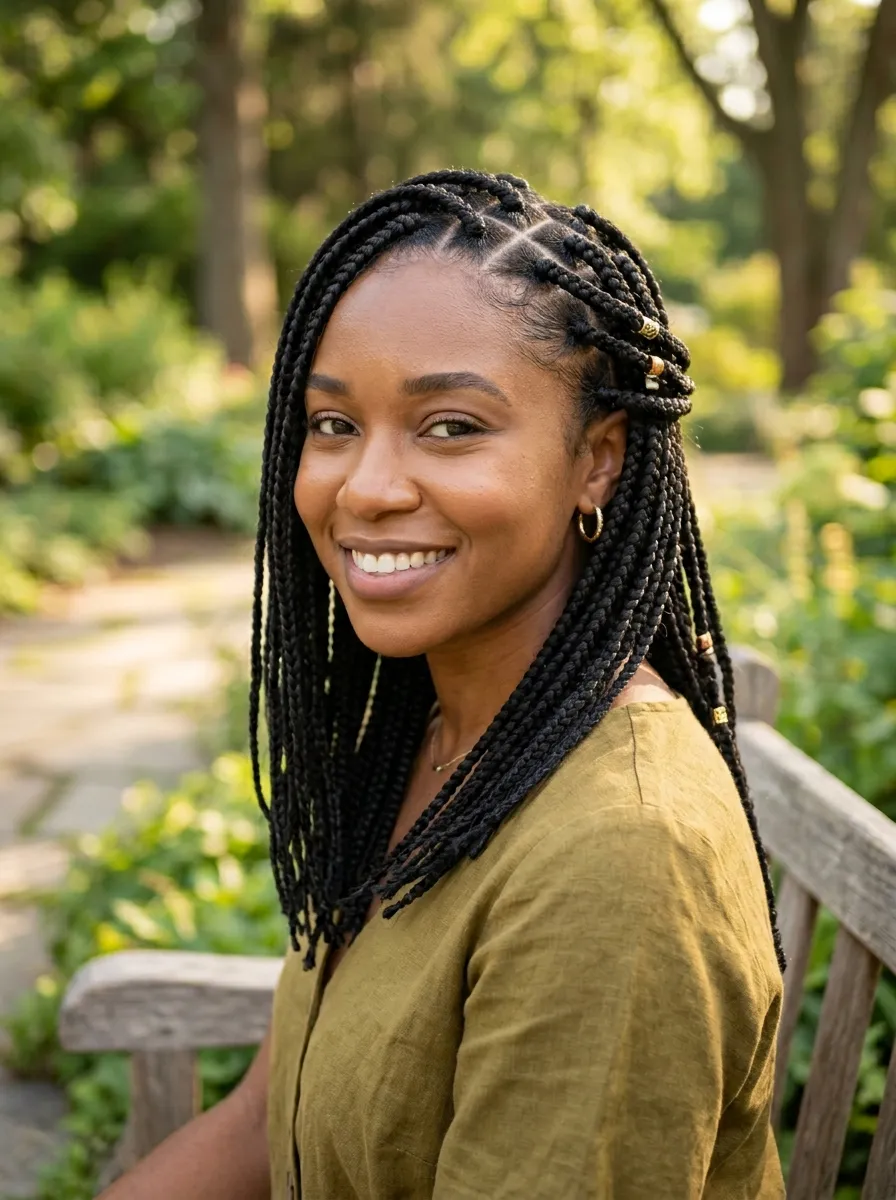
Knotless box braids start with your own natural hair and gradually feed in extension hair. This creates a flat, natural-looking root without the bulky knot that traditional box braids have.
Because there is no knot at the base, knotless braids are lighter and put less tension on the scalp. This makes them more comfortable to wear and better for hair health.
Divide the hair into neat square sections across the entire head. Begin braiding with your own hair for the first few passes before adding small pieces of extension hair to build thickness.
This technique requires more patience than traditional box braids but the result is worth it. The roots lie flat and the style looks much more natural.
Kanekalon or pre-stretched braid hair works best for this style. Pre-stretched hair is easier to work with and creates a more uniform result.
Keep box braids moisturized with a light oil or braid spray. Pay special attention to the scalp and the ends.
Box braids can be worn in endless styles: ponytails, buns, half-up, side parts. They also work with accessories like cuffs, wraps, and scarves.
This is one of the most popular protective styles right now because it looks clean, lasts four to six weeks, and gives maximum styling flexibility.
18. Braided Updo for a Formal Occasion
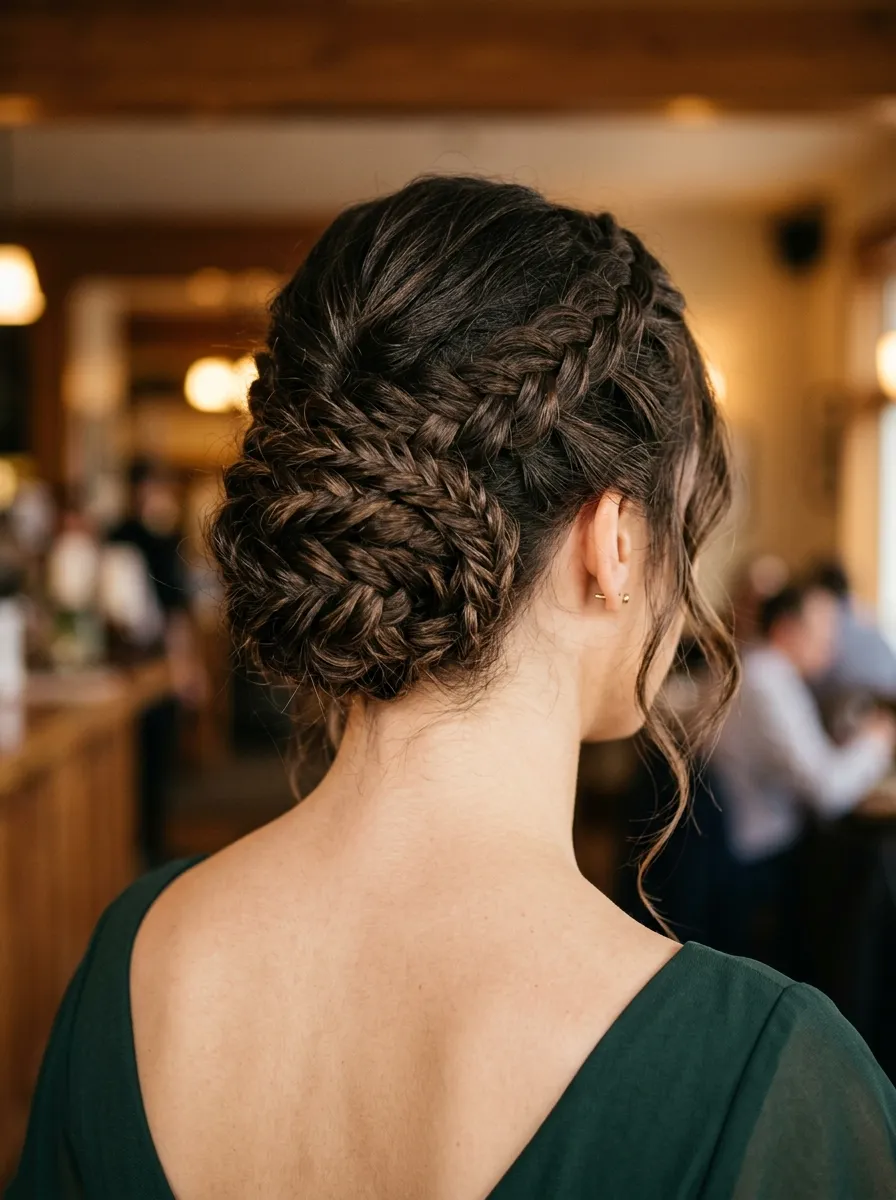
A braided updo takes multiple braids and combines them into an elegant structured style that works for weddings, proms, and formal events.
Start by making several braids throughout the hair. These can be simple three-strand braids or French braids depending on your preference and skill level.
Gather the braids together and coil, twist, and pin them into a structured shape at the back or top of the head. There is no single correct approach. The goal is to create a full, dimensional shape.
Use bobby pins that match your hair color to secure each braid in place without them showing.
Pull a few soft pieces loose near the temples and ears. These soften the formal look and make it feel more romantic rather than rigid.
Add decorative pins, pearls, or small clips to the updo for a special touch. These are available at beauty supply stores for a few dollars.
If you are not confident in your braiding or pinning skills, practice the updo a week before your event. This gives you time to work out any issues before the real day.
The braided updo can be as simple or as detailed as you want. Even a version using just two or three braids coiled into a bun looks stunning with the right accessories.
19. Goddess Braids for a Regal Protective Style
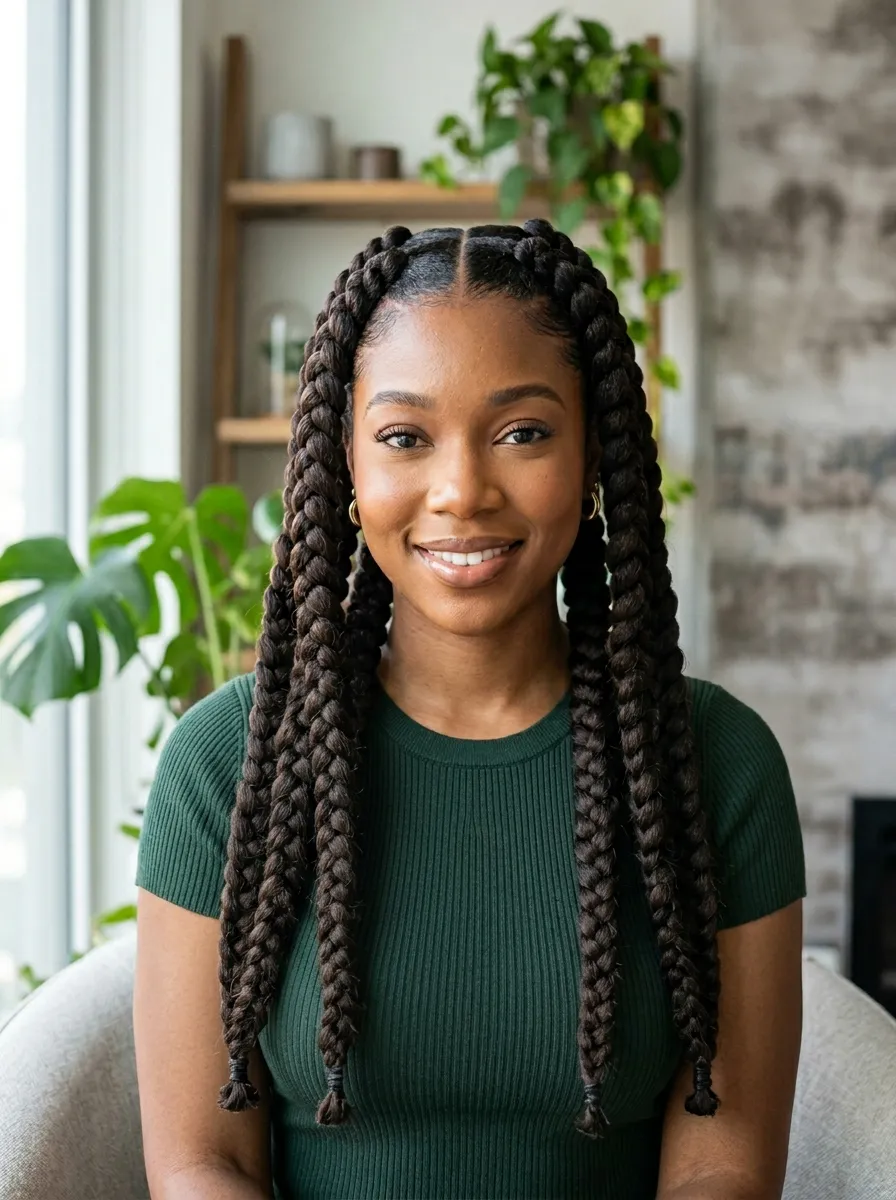
Goddess braids are oversized cornrow braids. They are large, bold, and sculptural, creating a dramatic graphic effect on the scalp.
Where regular cornrows might have eight to ten rows, goddess braids typically use three to six very wide rows. Each braid is thick and raised.
Part the hair into wide, even sections from front to back. Cornrow each section using a feeding technique to add hair from outside the braid as you work toward the nape.
The wide sections are what create the goddess braid look. If the braids are too thin, you lose the bold, oversized effect.
Extensions can be added to create more length or volume. Or you can work purely with your own hair if it is thick enough.
Goddess braids are often worn in straight-back rows but can also be done in curved patterns, swirled designs, or even in a crown formation around the head.
This style looks excellent on natural and afro-textured hair but can be done on any thick hair type.
The large scale of the braids makes them easier and faster to do than smaller cornrows. A full head of goddess braids can be completed in one to two hours.
Use edge control along the hairline and each part to keep the style clean and defined.
20. Braided Headband for an Easy Accessory Look
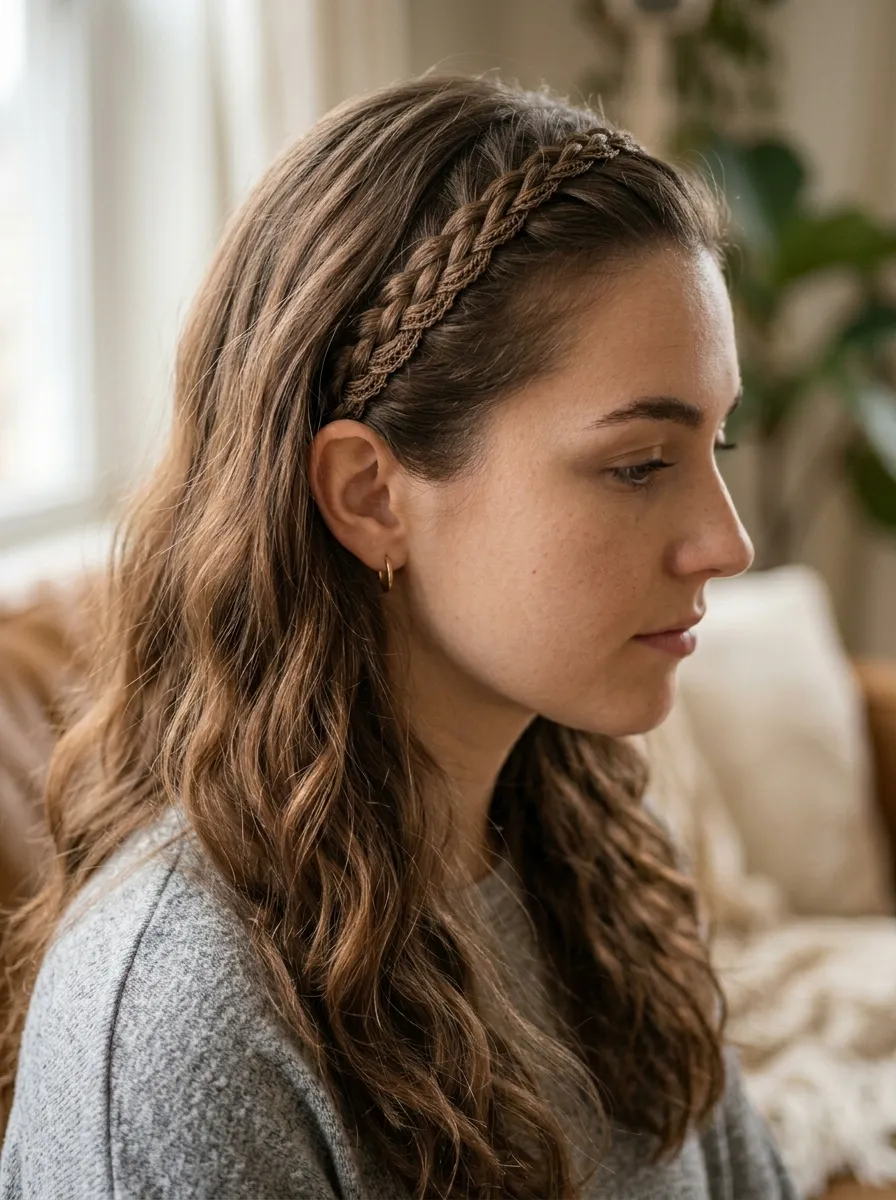
A braided headband is a single braid that runs along the hairline from one side of the head to the other. It frames the face like a real headband but requires no accessories.
Start a small French braid at one temple. Work it along the hairline, incorporating small pieces of hair from the front as you go.
When you reach the other temple, secure the braid with bobby pins and tuck the end under. The braid should sit right along the hairline, framing the face from ear to ear.
Leave the rest of the hair completely down. The contrast between the neat braided frame and the loose hair below is very effective.
This is one of the best styles for keeping hair out of your face without pulling it all back. The front stays tidy while the rest of your hair is free.
For a quicker version, braid a section of hair near the temple without adding extra hair. Bring it across the front of the head and pin it on the other side. This takes about two minutes.
Use a few bobby pins that match your hair to secure the ends discreetly.
This is a great style for second-day hair. The braid adds intentionality to hair that might otherwise look like it just woke up.
21. Triangle Box Braids for a Geometric Look
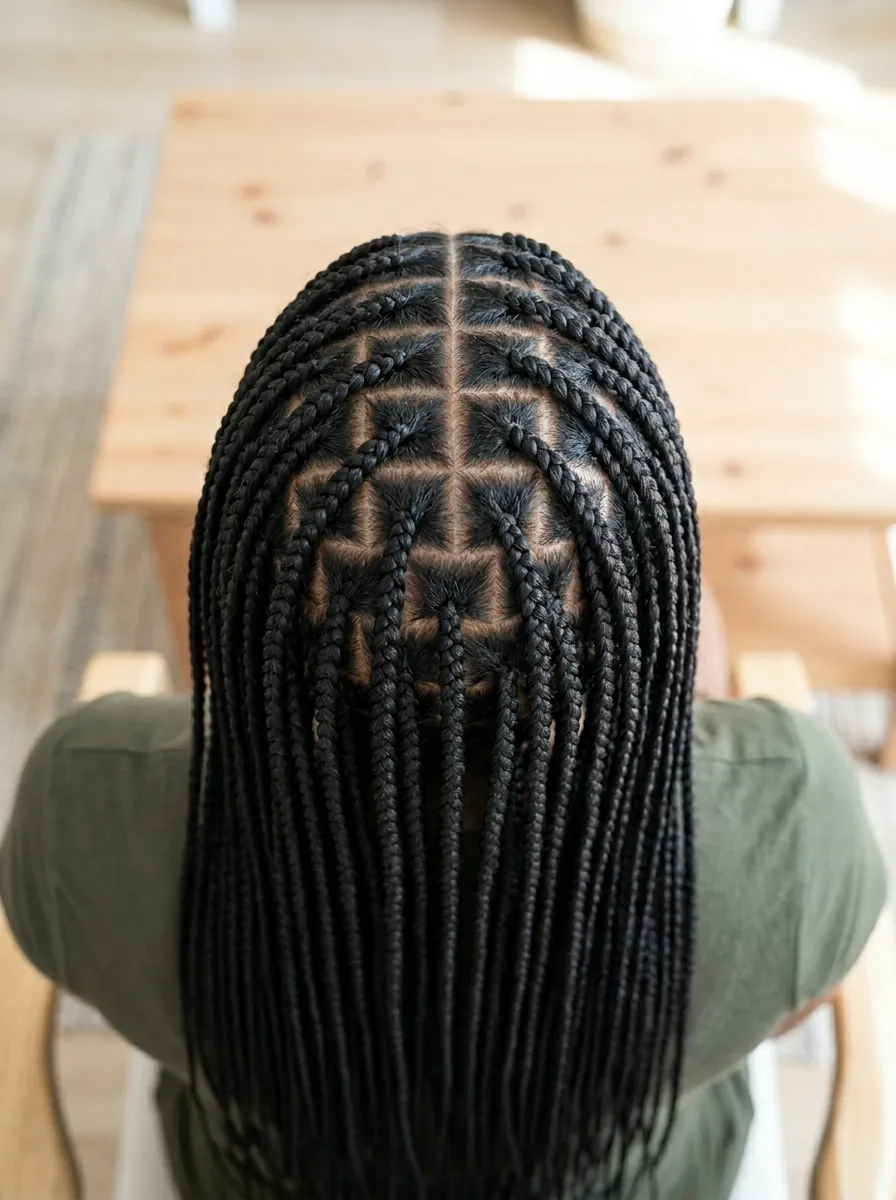
Triangle box braids follow the same braiding technique as regular box braids, but the sections are parted in triangular shapes instead of squares. This creates a more geometric, graphic look at the scalp.
The triangular parting is the defining feature. Use a rat-tail comb to create clean triangular sections across the entire head before you start braiding.
Because the parting pattern is visible as part of the design, clean and precise parts are what make this style stand out.
Everything else about the braiding technique is the same as standard box braids. You can use extensions to add length and volume.
Triangle box braids look especially striking from above or when the hair is pulled up, because the geometric parting becomes a design feature rather than just a functional division.
Try alternating the direction of the triangles for a more complex pattern. Or keep all triangles pointing the same direction for a clean, uniform look.
This style suits all hair textures and lengths when extensions are used. The sections can be made smaller for a more detailed look or larger for a bolder, bigger result.
Accessorize with gold hair cuffs threaded onto the ends of individual braids for an extra decorative touch.
Triangle box braids are a great way to add something different to a familiar style.
22. Pull-Through Braid for Volume and Drama
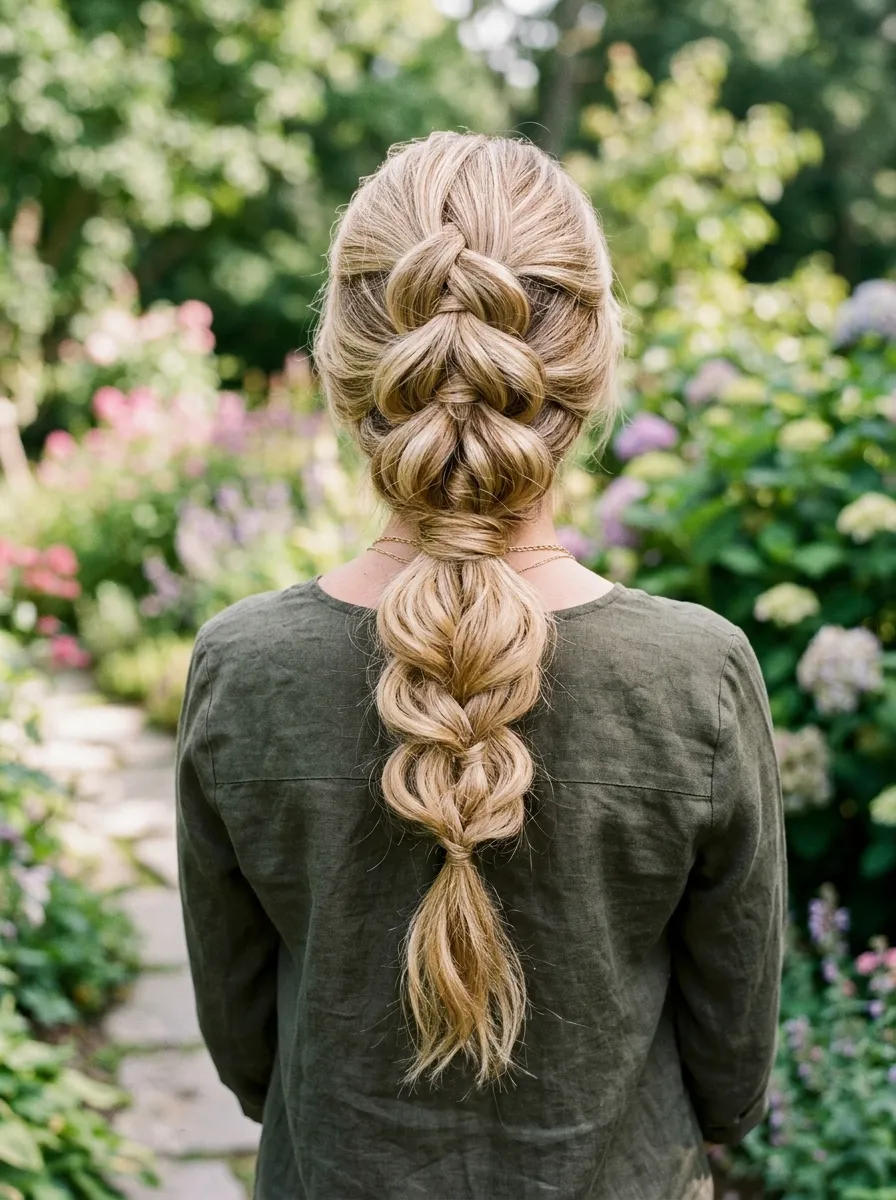
The pull-through braid is a technique that creates the illusion of a thick, intricate braid. It actually involves no traditional braiding at all. Small ponytails are pulled through each other to create the look.
Start with a small ponytail at the crown. Add a second ponytail just below it, split the first ponytail in half, and pull the second one through the split.
Continue adding ponytails below each previous one and pulling them through in the same way. Work all the way to the nape of the neck.
The result looks like a large, full braid but is created entirely with elastics. This makes it accessible even for beginners who are still learning traditional braid techniques.
After finishing, gently pull each loop outward to widen the braid and add volume. The wider you pull, the more dramatic the effect.
This style creates incredible fullness on fine or thin hair. The technique naturally adds volume that regular braids cannot achieve.
Pair it with loose waves below for a romantic half-up look. Or use it as a full updo by gathering the bottom into a bun.
Use elastics in small sizes. Remove them carefully at the end by cutting rather than pulling to avoid hair breakage.
23. Braided Space Buns for a Playful Style
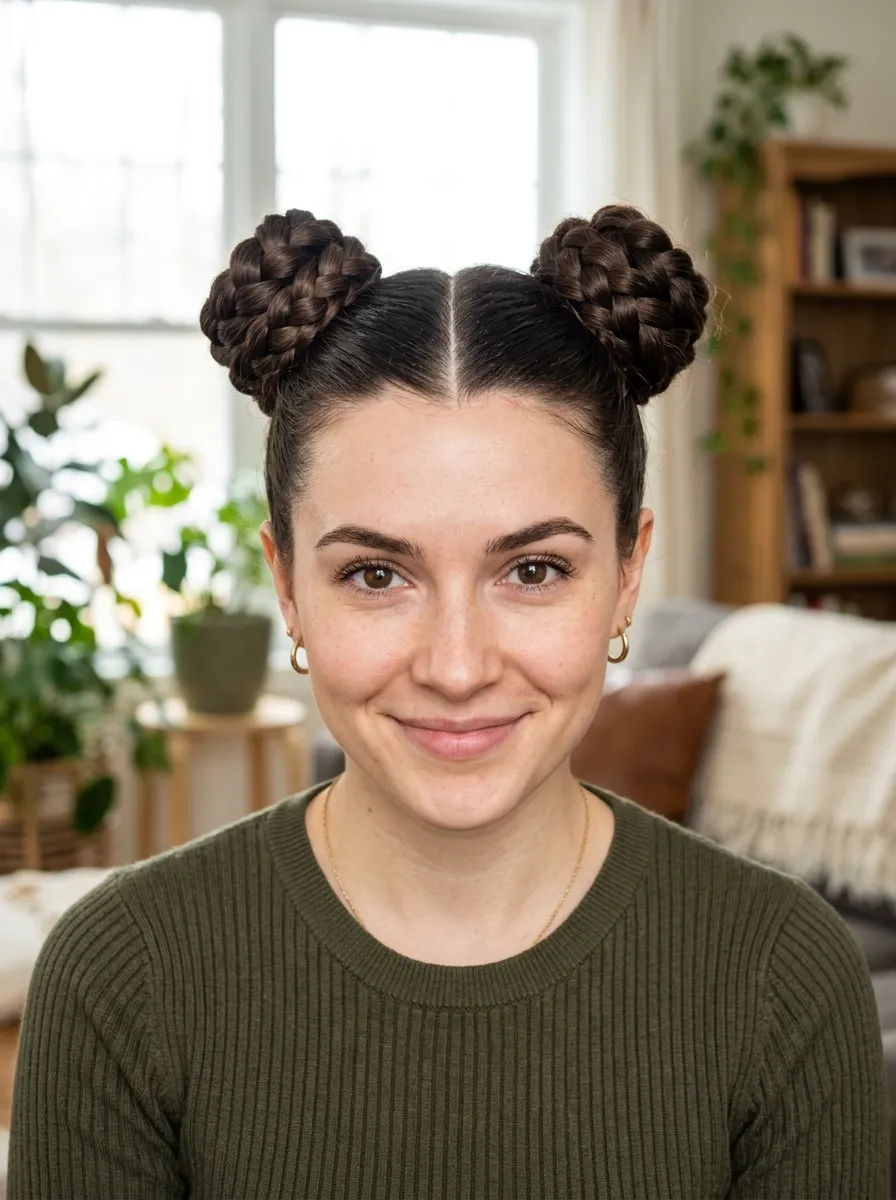
Braided space buns combine two of the most popular hair trends into one style. Instead of regular twirled buns, each space bun is made from a Dutch braid coiled into a circle.
Part the hair down the center. On each side, create a Dutch braid starting at the hairline and working back.
When the braid reaches the nape area, coil it into a bun and pin it in place with bobby pins. Secure the base with a hair tie first, then wind the braid around it and pin the end.
The Dutch braid gives the bun a raised, textured look rather than a flat, smooth appearance.
This style is playful and modern. It works for festivals, casual days, or any occasion where you want to have fun with your hair.
Leave a few face-framing pieces loose for a softer look. Or keep it neat and polished for a more put-together result.
Space buns are very practical for thick or long hair that can be hard to manage in other updos. The weight is distributed on both sides of the head, making them comfortable to wear all day.
Try decorating each bun with a small clip, a ribbon, or a metallic hair ring for a more dressed-up version.
24. Braided Mohawk for a Bold Runway Look
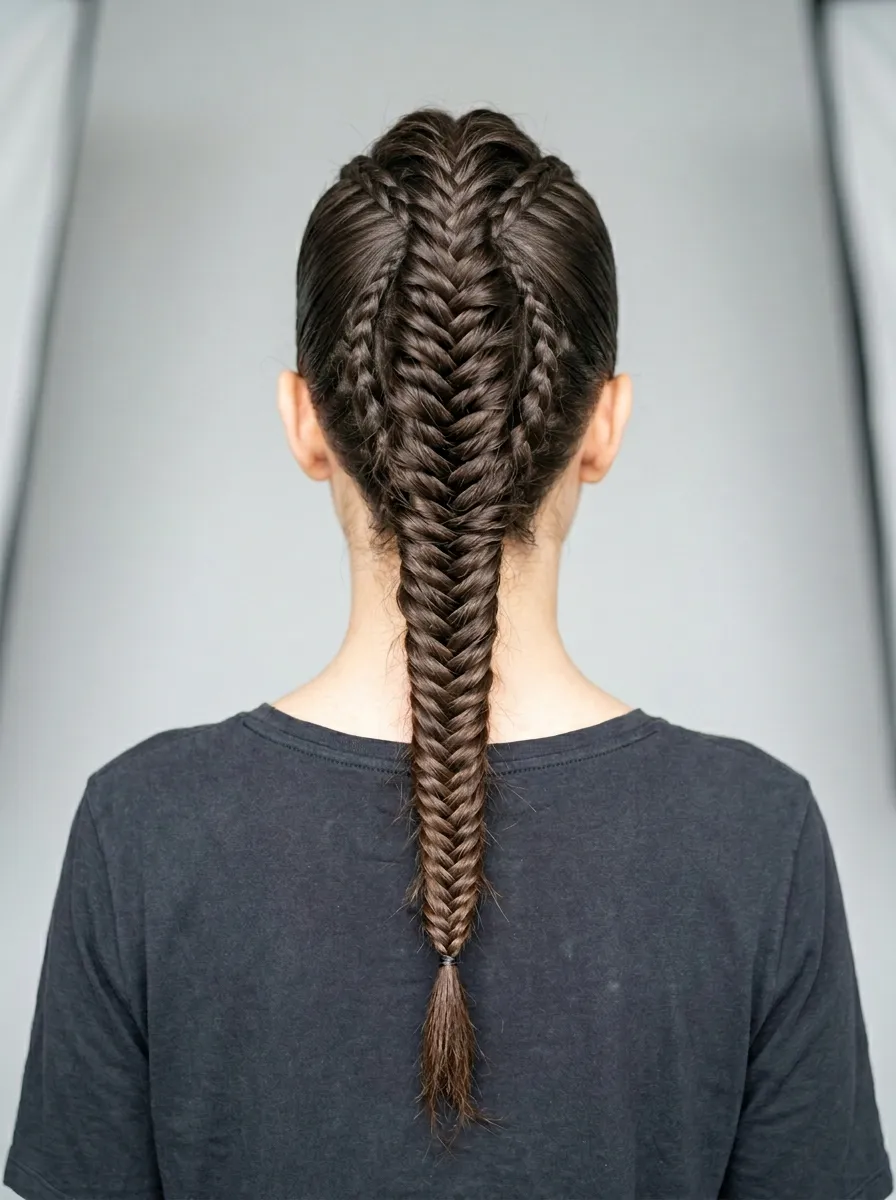
The braided mohawk creates a dramatic center strip effect without any actual shaving or cutting. French or Dutch braids on each side sweep upward toward the center, creating the mohawk silhouette.
Start with two French braids on each side of the head, directing them upward toward the center as you braid.
When each side braid reaches the center, join them into a single braid that runs down the middle of the back. This can be a fishtail, Dutch, or simple three-strand braid.
The result is a sculpted, architectural style that looks like runway work but can be done entirely at home.
For a softer version, let the center braid be loose and slightly undone. For a harder, more dramatic look, keep everything tight and smooth.
Use edge control or a boar bristle brush to smooth the sides before braiding so they lie flat and sleek.
This style works especially well for natural hair with texture, as the center braid has more grip and volume to work with.
The braided mohawk lasts well throughout the day because the French braid sides hold securely to the scalp.
It suits active days, events, and any occasion where you want your hair to make a statement.
25. Zigzag or Pattern Cornrows for Artistic Expression
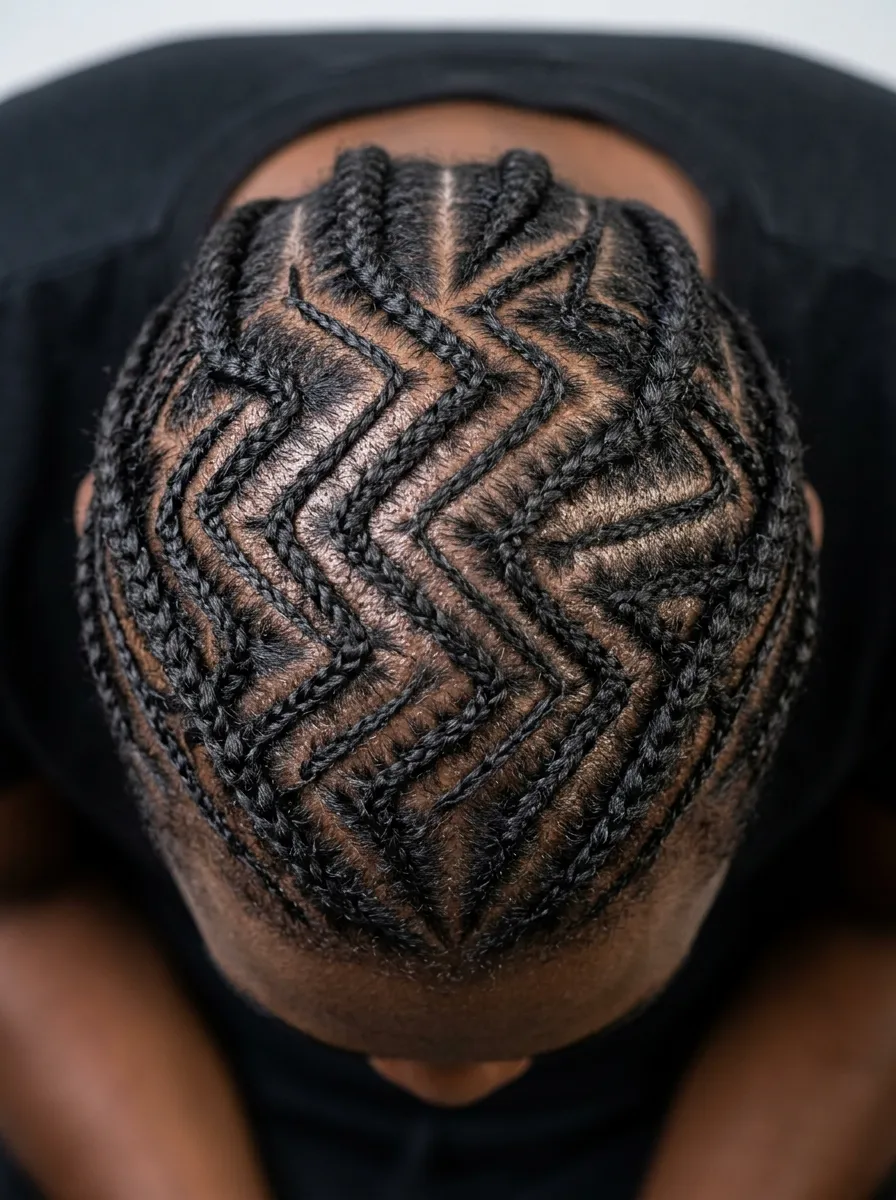
Cornrows are one of the oldest braiding traditions and they have always been an art form. Modern pattern cornrows take the technique to its most creative expression, using curved, zigzag, and geometric parting designs.
The braiding technique itself is traditional cornrowing. What changes is the parting pattern. Instead of straight lines, the parts follow angles, curves, spirals, or geometric shapes.
Plan your design before you start parting. Sketch it out roughly or find a reference image. Having a clear picture of where each row should go makes the work much easier.
Use a rat-tail comb for the parting. Clean, sharp parts are what make pattern cornrows look polished rather than improvised.
Start simple. A zigzag pattern with three or four rows is a manageable first attempt at pattern cornrowing. Build complexity as your skills grow.
Pattern cornrows can be done without extensions on natural afro-textured hair. They can also incorporate extensions for added length at the ends.
This style is deeply cultural and has been worn for centuries across African and African diaspora communities as a form of identity, beauty, and artistry.
Maintain the style with light oil along the parts and a satin bonnet at night. With good care, pattern cornrows last two to four weeks.
This is one of the most artistic and expressive things you can do with hair. Each design is unique to the person wearing it.
Braids are one of the few hairstyle categories where something new is always possible. Whether you are learning your first three-strand braid or working up to geometric cornrows, every style on this list is achievable with practice and a little patience. Start with the simpler styles, get comfortable with the basic motions, and work your way toward the ones that excite you most. You do not need a salon appointment or an expensive budget to wear beautiful braids. All you need is time, a comb, some hair ties, and the willingness to try. Pick one style from this list today, follow the steps, and wear it with confidence. Your next favorite hairstyle is closer than you think.
Leave a Reply