
1. Curly Bohemian Shag with Face Framing Layers
![[Image Prompt: A photograph of curly hair styled into a bohemian shag with soft face-framing layers, natural curls catching light near a window, warm neutral tones, shot on a high-end camera with fine detail on individual curl strands, relaxed candid pose.]](https://boldtress.com/wp-content/uploads/2026/07/1_202607062254_22_11zon.webp)
Curly hair and shag layers are a natural match. The curls do half the styling work for you. Ask your stylist to cut layers that follow your curl pattern instead of fighting it. This keeps volume at the crown and softness around the face. At home, apply a curl cream to damp hair and scrunch upward. Skip the brush. A wide-tooth comb works better and won’t disturb the curl shape. Face-framing pieces should sit just above the cheekbone for the most flattering line. If your curls tend to frizz, a small amount of oil on dry ends smooths things out without weighing hair down. This style needs almost no daily maintenance once cut correctly. A quick refresh with water and a spray bottle in the morning brings curls back to life. Budget tip: find a curly hair specialist for the initial cut, then maintain length at home with basic thinning shears every few months. This saves money while keeping the shape intact between salon visits.
2. Long Feathered Gypsy Shag hairstyle ideas

Long feathered layers give the classic gypsy shag its signature movement. The ends flip outward instead of curling under, creating a lived-in, wind-blown look. To style at home, use a round brush and blow-dry ends away from your face. A flat iron with a slight outward flick also works if you’re short on time. This cut suits hair past the shoulders and adds shape without cutting off much length. Feathered layers work best when layers are cut throughout the length, not just at the bottom. Ask your stylist for point cutting to soften the ends further. Budget option: practice the outward flick technique with a basic round brush before investing in a fancier tool. Dry shampoo at the roots between washes keeps volume without daily washing. This style also hides split ends well, since the choppy layers break up any visible damage at the tips, making it a practical pick if you’re stretching time between trims.
3. Short Pixie Shag with Wispy Bangs

Short hair gets a rebellious update with the pixie shag. Choppy layers at the crown add texture while wispy bangs soften the whole look. This cut suits people who want low maintenance without sacrificing style. A small amount of texturizing paste rubbed between palms and pressed into dry hair creates instant definition. No heat tools required most days. Wispy bangs should be cut dry, in thin sections, for the most natural finish. If you’re trying this at home between salon visits, trim bangs with sharp shears in tiny increments, cutting less than you think you need. Budget tip: this cut uses less product than longer shags since there’s less hair to manage. A travel-size pot of styling paste can last months. Wash less frequently too, since short hair with texture actually looks better slightly unwashed. This makes it one of the more affordable shags to maintain long term, both in salon visits and daily products.
4. Choppy Layered Shag for Fine Hair

Fine hair often looks flat, but choppy layers change that. Uneven layers create the illusion of thickness by breaking up the hair’s weight. Ask for shorter layers near the crown and gradually longer pieces toward the ends. This adds lift right where fine hair needs it most. At home, flip your head upside down and blow-dry roots for instant volume. A light mousse applied to damp roots holds that lift through the day. Avoid heavy oils or serums, which can flatten fine strands fast. Texturizing spray on dry hair adds grip without buildup. Budget tip: a single travel bottle of root-lifting mousse goes a long way since fine hair needs only a small amount. Skip expensive volumizing shampoos and instead try a clarifying wash once a week to remove product buildup that weighs hair down. This keeps the shag looking full between salon appointments without spending extra on specialty products.
5. Curtain Bangs Gypsy Shag

Curtain bangs paired with shag layers frame the face without the commitment of a full fringe. The bangs part naturally in the middle and blend into the rest of the layers. This combination suits nearly every face shape since the length can be adjusted to sit anywhere between the brow and cheekbone. Styling takes minutes. Blow-dry bangs with a round brush, curling them slightly outward on each side. On busy mornings, a flat iron with a quick bend does the same job. Curtain bangs grow out gracefully, blending into face-framing layers rather than looking awkward like a straight-across fringe. Budget tip: grow bangs from your existing layers instead of a separate cut, saving a trim fee. Use a small round brush you already own rather than buying a specialty tool. This style also works well air-dried with a light texturizing cream scrunched through damp bangs for a relaxed, undone finish that takes no extra time.
6. Shag with Balayage Highlights
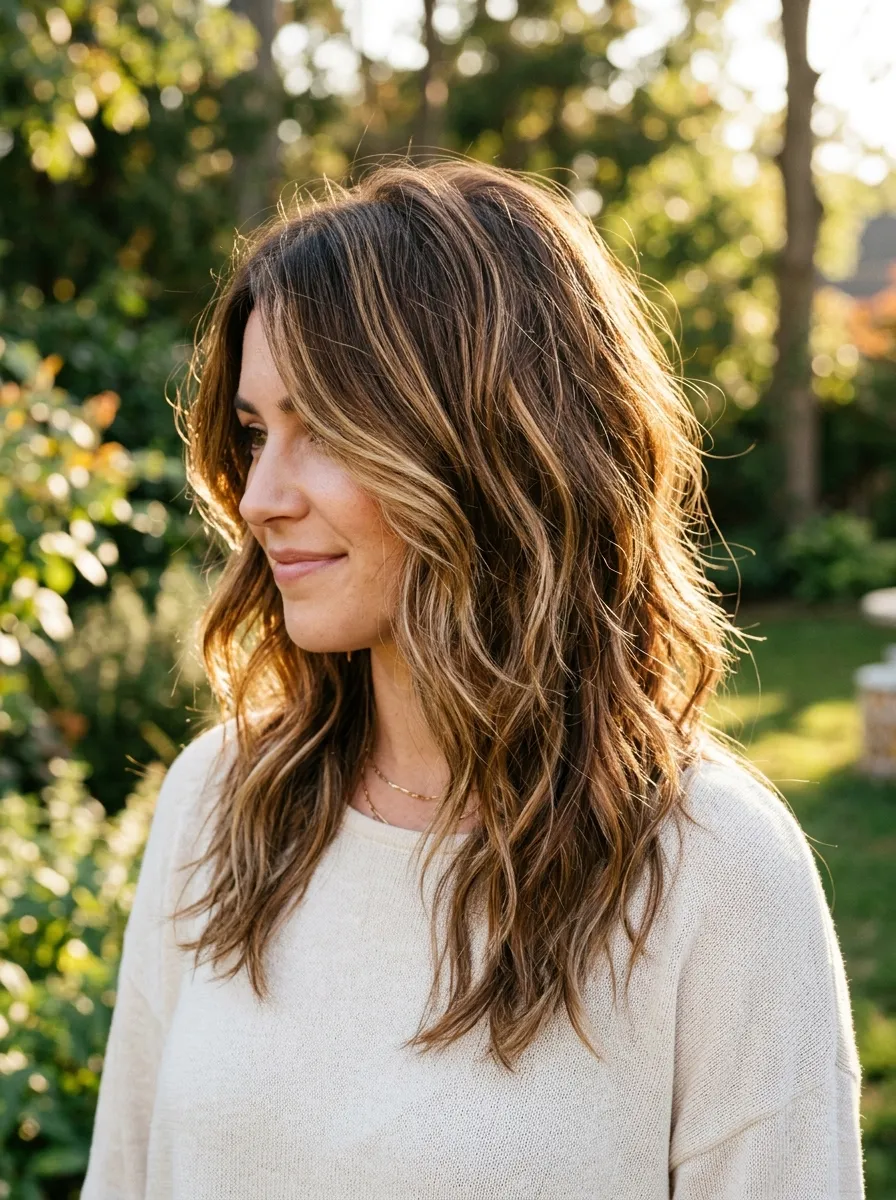
Layers show off color beautifully, and balayage highlights make each piece of a shag stand out. The hand-painted technique adds depth without heavy maintenance, since roots grow out softly rather than showing a harsh line. Ask your colorist to focus highlights around the face and through the ends where layers are shortest. This draws attention to the shape of the cut itself. At home, use a purple shampoo once a week to keep any brassy tones in check. Balayage typically needs touch-ups every few months instead of every few weeks, which saves money over time compared to full highlights. Budget tip: ask for a partial balayage focused only on face-framing pieces rather than a full head application. This cuts the cost significantly while still giving the shag noticeable dimension. A leave-in conditioner with UV protection helps prevent fading if you spend time outdoors, keeping the color looking fresh between salon visits without extra treatments.
7. Grunge Inspired 70s Shag

The grunge shag brings back a rougher, undone version of the 70s cut. Layers are choppier, ends are blunter in places, and the overall finish looks intentionally messy. This style pairs well with a middle part and minimal styling. A texturizing spray scrunched through damp hair, then air-dried, gives the rough finish this look calls for. Skip the round brush entirely here. Messy texture is the goal, not smooth waves. If you want extra grip, rub a small amount of clay or paste between your fingers and work it through the mid-lengths and ends only. Budget tip: this is one of the cheapest shag styles to maintain since it thrives on unwashed, textured hair. Fewer washes mean less shampoo and conditioner used monthly. A basic sea salt spray, which costs very little, recreates the rough texture without a trip to the salon for a treatment, making this a practical everyday option for anyone on a tight routine.
8. Wavy Beach Shag

Waves and shag layers together create a relaxed, beach-ready look that needs very little effort. The layers add shape to natural waves instead of weighing them down. A sea salt spray applied to damp hair, then air-dried or diffused, brings out texture without heat damage. This style suits medium to long hair best, since waves need some length to show their full movement. Loose waves paired with shorter layers around the face keep the whole look soft rather than stiff. Budget tip: make your own texturizing spray at home using water, sea salt, and a small amount of leave-in conditioner in a spray bottle. This costs a fraction of store-bought versions and works just as well. Avoid heavy styling creams, which can make waves look greasy rather than beachy. A diffuser attachment for your blow-dryer, often inexpensive, speeds up drying time while preserving the natural wave pattern this shag relies on for its relaxed finish.
9. Butterfly Shag Layers

The butterfly shag layers hair in a way that mimics wings opening outward, with shorter pieces at the crown fanning into longer layers below. This creates dramatic volume without cutting off much overall length. It suits medium to long hair and works on straight or wavy textures equally well. Styling involves a round brush and blow-dryer, flipping the ends outward section by section. A flat iron can achieve a similar effect faster if you’re pressed for time. Volume at the crown is the defining feature of this cut, so backcombing lightly at the roots before styling helps the shape hold through the day. Budget tip: this cut requires precise layering, so it’s worth paying for one good cut rather than attempting it at home. Once cut correctly, maintenance is simple with basic tools you likely already own. A lightweight mousse at the roots, rather than a heavy gel, keeps the volume looking natural instead of stiff or overdone.
10. Mullet Shag Hybrid
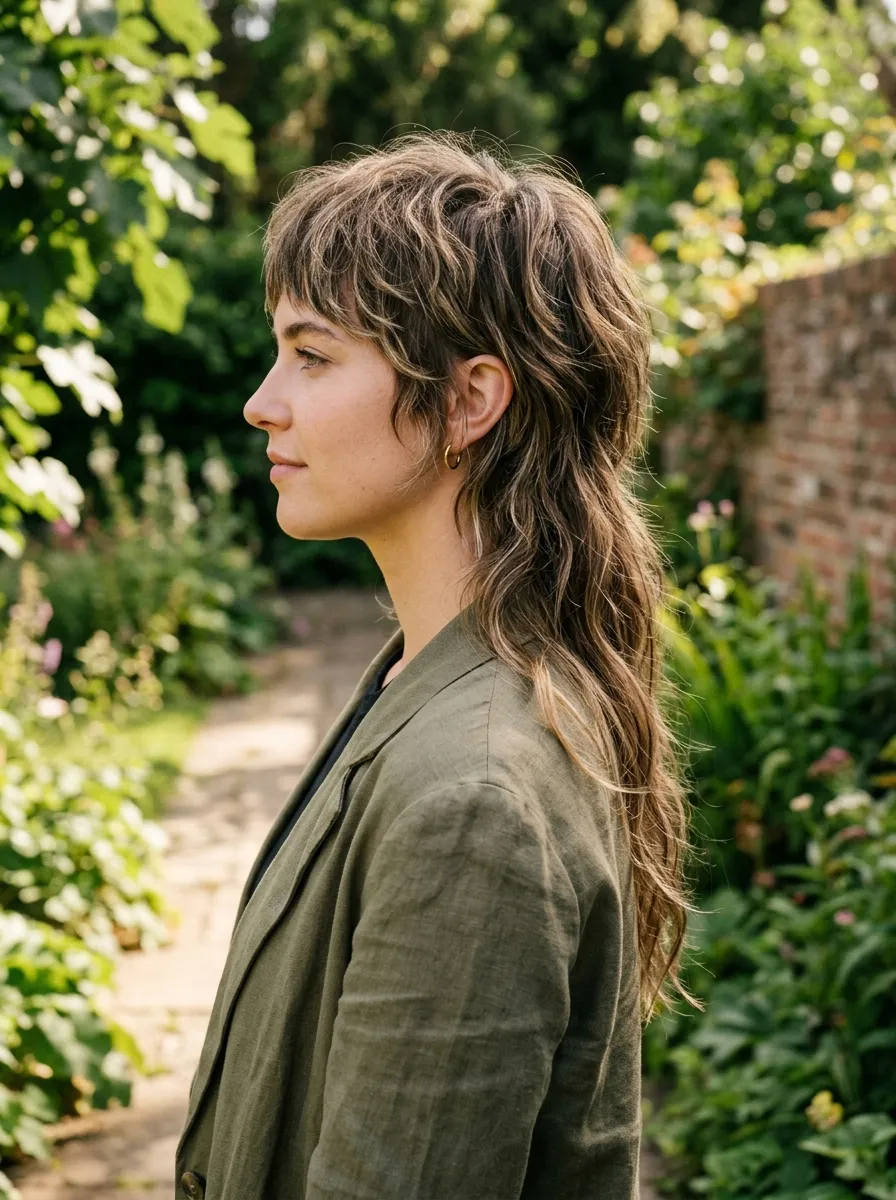
Combining a mullet with shag layers creates a bold cut that’s shorter on top and longer in the back, with choppy texture throughout. This style suits people wanting a statement look without going fully short. The top layers are cut close and textured, while the back retains length and softer layering. At home, styling the top involves a small amount of texturizing paste worked through with fingers for a piecey finish. The back can be left to air-dry naturally or lightly waved with a flat iron. Contrast between lengths is what makes this cut stand out, so keeping the layering distinct between the top and back sections matters during the cut itself. Budget tip: this style hides regrowth well since the choppy layers naturally blend new growth into the existing texture. This means fewer trims are needed to keep the shape looking sharp, which saves money on salon visits compared to more precise, symmetrical haircuts that show growth quickly.
11. Silver and Gray Gypsy Shag

Gray and silver tones bring a modern edge to the gypsy shag. The cooler color makes choppy layers look more defined, since the tone catches light differently than warmer shades. This works whether you’re embracing natural gray or coloring hair to achieve the look. A purple or blue-toned shampoo keeps silver tones cool and prevents yellowing between salon visits. Silver hair tends to be drier, so a lightweight leave-in conditioner applied to mid-lengths and ends helps maintain shine without weighing down the layers. Budget tip: if you’re transitioning to natural gray, skip frequent coloring appointments and let the shag layers grow out the color gradually, blending old and new hair color into the choppy texture. This saves significant money over time. Silver-toned dry shampoo, rather than the standard white version, also helps disguise roots between washes without leaving a visible residue, making it easier to stretch time between salon visits while keeping the tone looking fresh.
12. Textured Shag for Thick Hair

Thick hair carries shag layers exceptionally well since there’s enough density to support dramatic texture. Heavier layering removes bulk while keeping shape, making the hair feel lighter without losing volume. Ask your stylist for thinning shears combined with point cutting to break up thickness throughout the mid-lengths. At home, a lightweight texturizing spray on damp hair, followed by air-drying, keeps the layers separated rather than clumping together. Thick hair benefits from fewer products, not more, since extra product can make already-heavy hair feel weighed down. Budget tip: request a longer time between cuts, since thick hair tends to hold shag layers well even as it grows, unlike thinner hair that can look shapeless quickly. This reduces the number of salon visits needed per year. A wide-tooth comb, rather than a brush, helps detangle without disturbing the texture, keeping styling simple and quick on busy mornings without extra tools or time.
13. Curly Coily Shag for Natural Texture
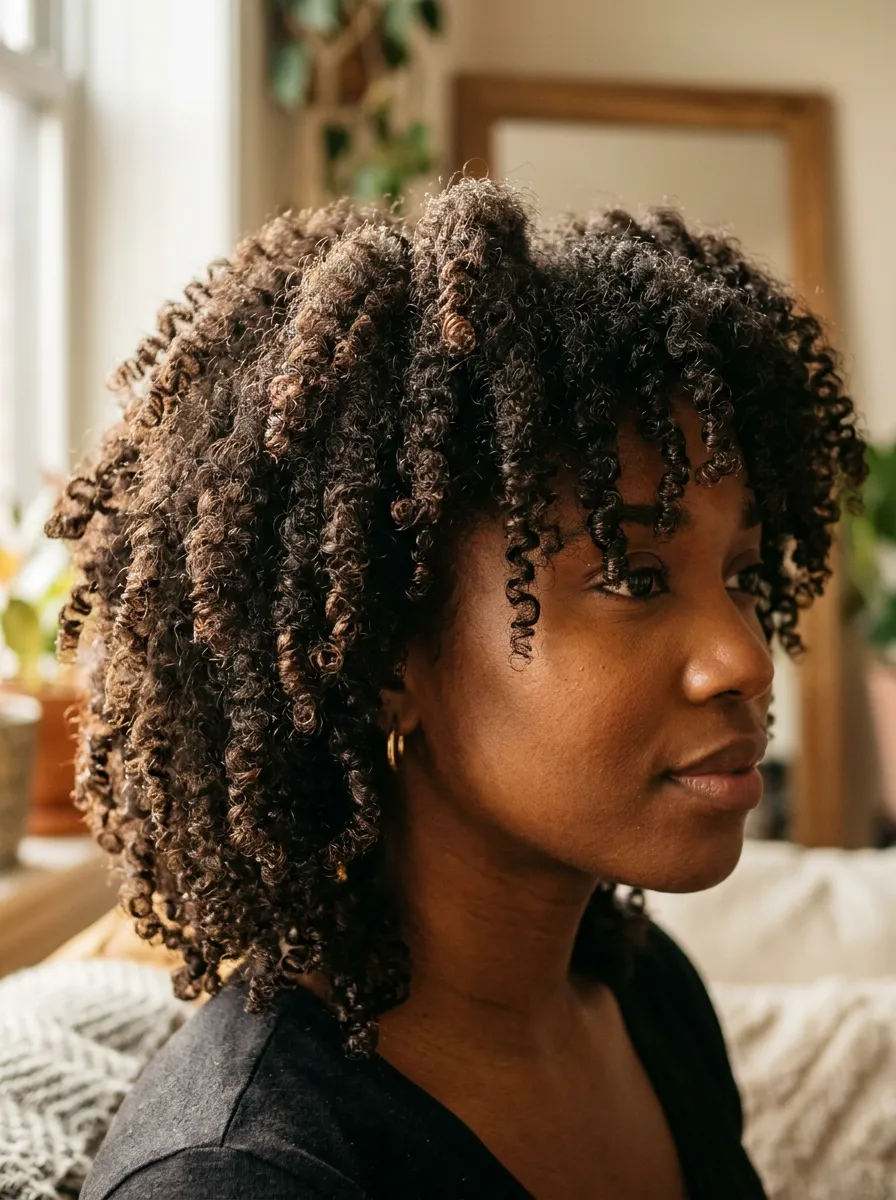
Coily hair and shag layers bring out natural curl definition in a way straight cuts often can’t. Layers cut while hair is dry and in its natural state let the stylist see exactly how each curl falls. This avoids the guesswork of cutting curly hair wet, which can shrink and change shape once dry. A curl-defining cream applied section by section, then air-dried or diffused, keeps each layer distinct. Natural curl pattern should guide the entire cut, so working with a stylist experienced in curly texture matters here. Budget tip: stretch time between trims by using the “search and destroy” method at home, snipping only visible split ends rather than a full trim. This preserves length and curl pattern while keeping hair healthy. A satin pillowcase, which costs very little, also reduces frizz and breakage overnight, helping the shag layers keep their shape longer between salon visits without extra spending on specialty curl products.
14. Medium Length Layered Shag

Medium length hits a practical sweet spot for the shag, long enough for layers to show movement but short enough to dry quickly. This length suits people wanting a low-effort daily routine. A round brush and blow-dryer create soft flips at the ends in under ten minutes. For no-heat days, air-drying with a light mousse still gives a soft, layered finish. Medium length shags also transition well between casual and dressed-up looks, since minimal styling adjustments change the overall feel. Budget tip: this length requires trims roughly every two to three months to maintain shape, which is less frequent than shorter cuts needing monthly upkeep. This saves money over a year of salon visits. A basic round brush, if you don’t already own one, is an inexpensive tool that handles most of the styling needs for this length, making it accessible without investing in multiple specialty products or tools.
15. Shag with Micro Bangs

Micro bangs sit higher on the forehead than traditional bangs, creating a bold contrast against longer shag layers behind them. This combination suits people wanting a distinctive look with a strong statement piece. Because micro bangs sit above the brow, they need regular trims to maintain their shape, roughly every three to four weeks. A small pair of sharp scissors makes at-home touch-ups manageable between salon visits. Micro bangs should always be cut dry, in thin sections, to avoid cutting them too short. Budget tip: invest in one quality pair of small cutting shears rather than repeated salon trims for bang maintenance alone. This pays for itself within a couple of months. Style bangs with a small round brush and minimal heat, since they dry quickly due to their short length. The rest of the shag layers can be left to air-dry, balancing a low-maintenance routine with one high-impact styling feature.
16. Rock and Roll Inspired Shag

This version of the shag leans into heavy texture and volume, drawing from decades of rock-inspired hair. Layers are choppier, teasing at the roots adds height, and the overall finish looks purposefully undone. A backcombing comb, used sparingly at the crown, builds the volume this look needs. Texturizing spray, worked through mid-lengths and ends, adds the rough, grabbable texture that finishes the style. Heavy texture works best when hair is slightly dirty, so this is a good style for day two or three after washing. Budget tip: skip expensive texturizing products and reach for a basic sea salt spray instead, which achieves a similar rough finish at a much lower cost. Backcombing combs are inexpensive and last years with proper care. This style also holds well through long days or nights out, since the teased volume and textured layers resist falling flat compared to smoother, sleeker haircuts.
17. Soft Face Framing Shag for Round Faces

Round face shapes benefit from shag layers that add length and angles rather than width. Face-framing pieces cut at a diagonal, starting near the chin and extending past the jaw, create the illusion of a more elongated face. Avoid layers that stop right at the cheekbone, since this can widen the appearance of round features. At home, style face-framing pieces with a flat iron, angling them slightly inward toward the chin rather than out. Diagonal layers are the key detail to request from your stylist for this specific face shape. Budget tip: this adjustment doesn’t require extra products or tools beyond what you already use, since it’s primarily about the cutting angle rather than the styling technique. A single consultation with your stylist to explain your face shape concerns before the cut saves potential disappointment and additional trim costs later. This makes it a smart, low-cost way to customize the shag specifically for your features.
18. Blunt Ends Shag with Long Layers
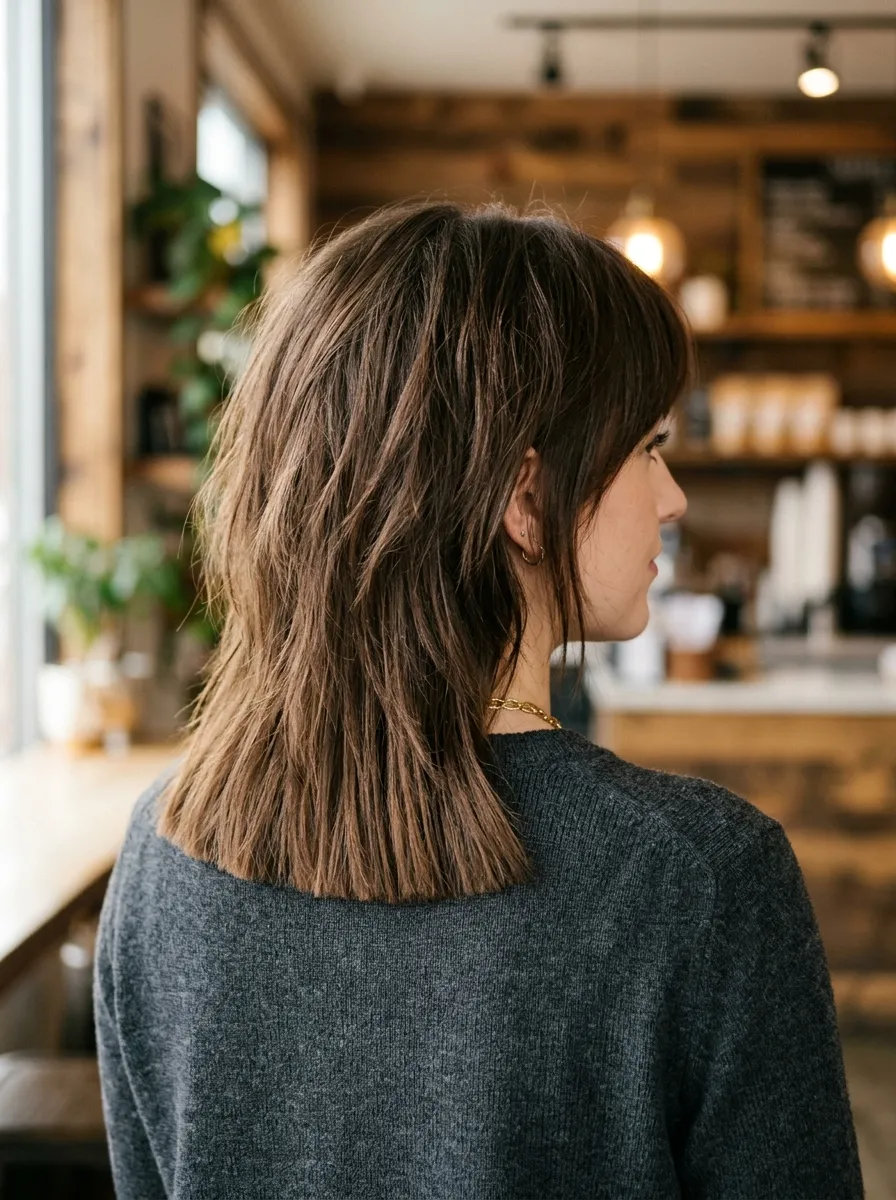
Blunt ends paired with long internal layers give this shag a slightly more polished edge than fully choppy versions. The blunt bottom line adds the appearance of thickness, while layers throughout the rest of the length keep movement and shape. This suits people wanting a shag that still feels a bit more refined for work or formal settings. Styling involves a flat iron on the ends for a smooth finish, while the internal layers can be left with more natural texture. Blunt ends actually make hair appear healthier, since there’s less visible fraying compared to fully layered ends. Budget tip: this style stretches trims further since blunt ends show less damage over time than choppy ones, meaning fewer salon visits purely for shape maintenance. A basic flat iron, used only on the bottom few inches, keeps styling time short while still achieving the polished look this version of the shag is known for.
19. Piecey Shag with Razor Cut Ends

Razor cutting creates soft, feathered ends that naturally separate into pieces rather than lying flat. This technique works especially well on a shag, since the whole point of the cut is textured movement. Ask your stylist specifically for a razor rather than scissors on the ends for this softer effect. At home, a texturizing paste rubbed between fingertips and applied only to the ends helps pieces stay separated throughout the day. Piecey texture looks best when it’s uneven rather than perfectly symmetrical, so avoid over-brushing after styling. Budget tip: razor-cut ends tend to need less product to maintain their separated look compared to blunt-cut hair, which often requires more styling product to achieve texture. This saves money on styling products over time. A small pot of paste, used sparingly, can last several months since only a small amount is needed per use to keep the piecey effect looking fresh and natural.
20. Curly Shag with Undercut
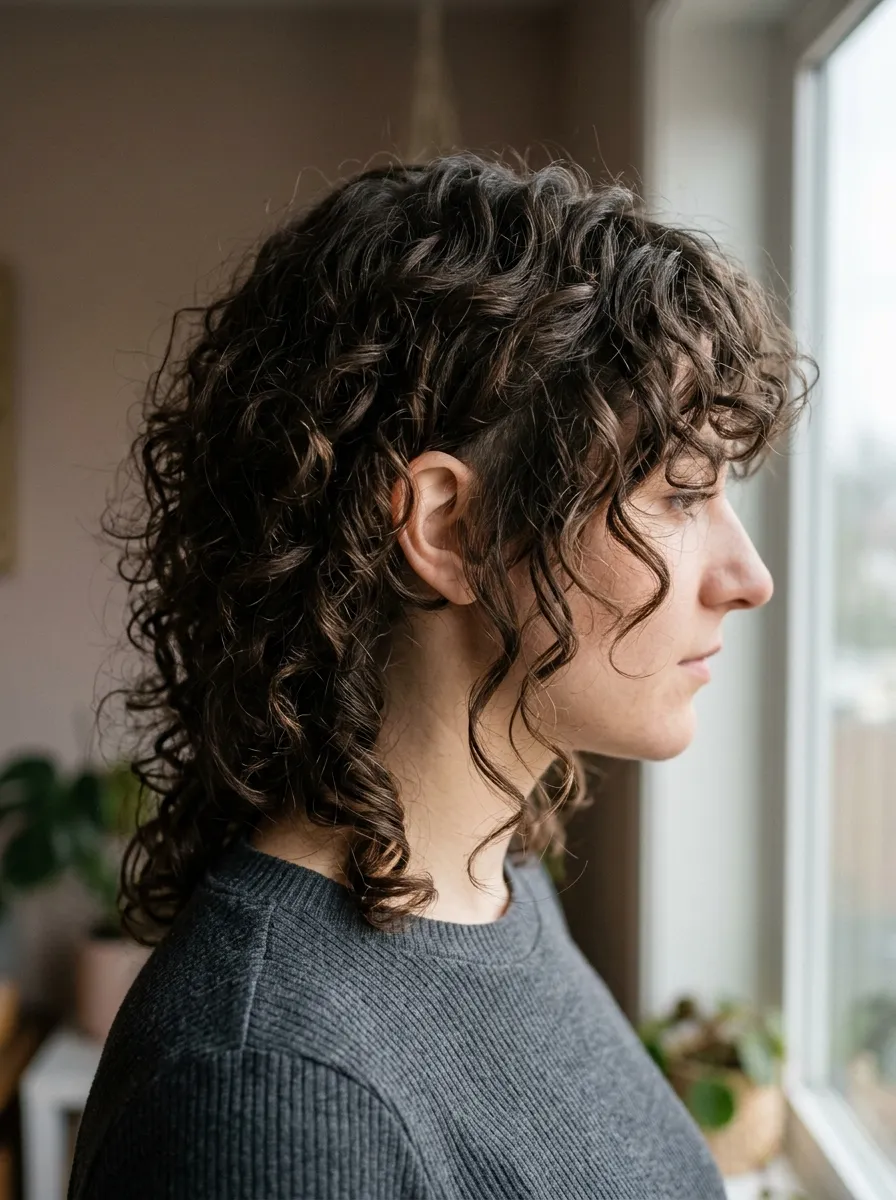
Adding an undercut beneath curly shag layers reduces bulk while keeping length and curl definition on top. This works well for people with thick, curly hair who want a lighter feel without sacrificing the fullness up top. The undercut is typically hidden beneath the longer curls, only showing when hair is pulled up or moved. Styling the top involves a curl cream applied to damp curls, scrunched upward, and left to air-dry or diffused. Hidden undercuts need occasional trims to prevent them from growing out and showing beneath the top layer unintentionally. Budget tip: undercuts require touch-ups roughly every six to eight weeks, but these trims are typically quicker and cheaper than a full haircut since only a small section is being maintained. This makes it possible to keep the style fresh without paying full price for a complete cut every time you need a shape refresh underneath the curls.
21. Shag with Bold Color Money Pieces

Money pieces, bold colored strands framing the face, add a graphic pop of color to shag layers without committing to an all-over dye job. This works with vivid colors or simply a lighter contrast against your natural shade. The color sits right where face-framing layers already exist, making the two techniques a natural match. At home, use a color-safe shampoo to prevent the bold pieces from fading too quickly. Money pieces typically need touch-ups every two to three months depending on how vivid the chosen color is. Budget tip: because only two thin face-framing sections are colored, this technique costs significantly less than full head color or balayage. It’s a practical way to experiment with bold color without a large financial commitment. A color-depositing conditioner, used every few washes, can extend vibrancy between salon appointments, stretching the time and money spent maintaining the bold contrast against the rest of the shag.
22. Vintage 70s Shag Bob
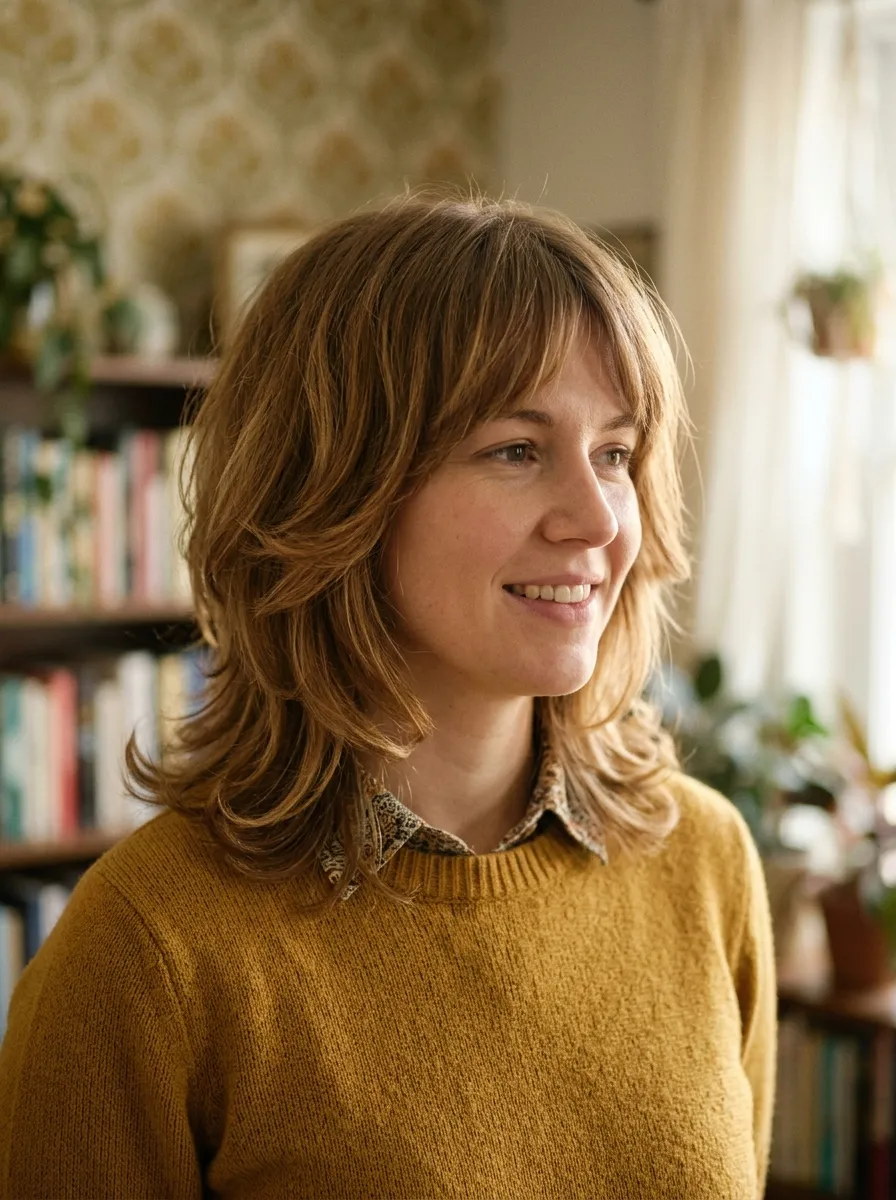
This shorter take on the shag brings back the rounded, bob-length silhouette popular in the 1970s, updated with softer, more blended layers. It sits around chin to shoulder length with ends flipping outward or under depending on preference. This suits people wanting the shag’s texture without committing to longer hair. Styling requires a round brush and blow-dryer, working in sections to flip the ends in the desired direction. A flat iron with a curved barrel can achieve a similar effect more quickly on busy days. Rounded layers throughout the crown add the volume this vintage style is known for. Budget tip: shorter length means less product used per styling session compared to longer shags, which stretches a bottle of mousse or texturizing spray further over time. This length also dries faster, cutting down on blow-dryer use and the associated time and energy cost, making it a practical everyday option for those wanting vintage style on a modern schedule.
23. DIY Shag Trim at Home Tips
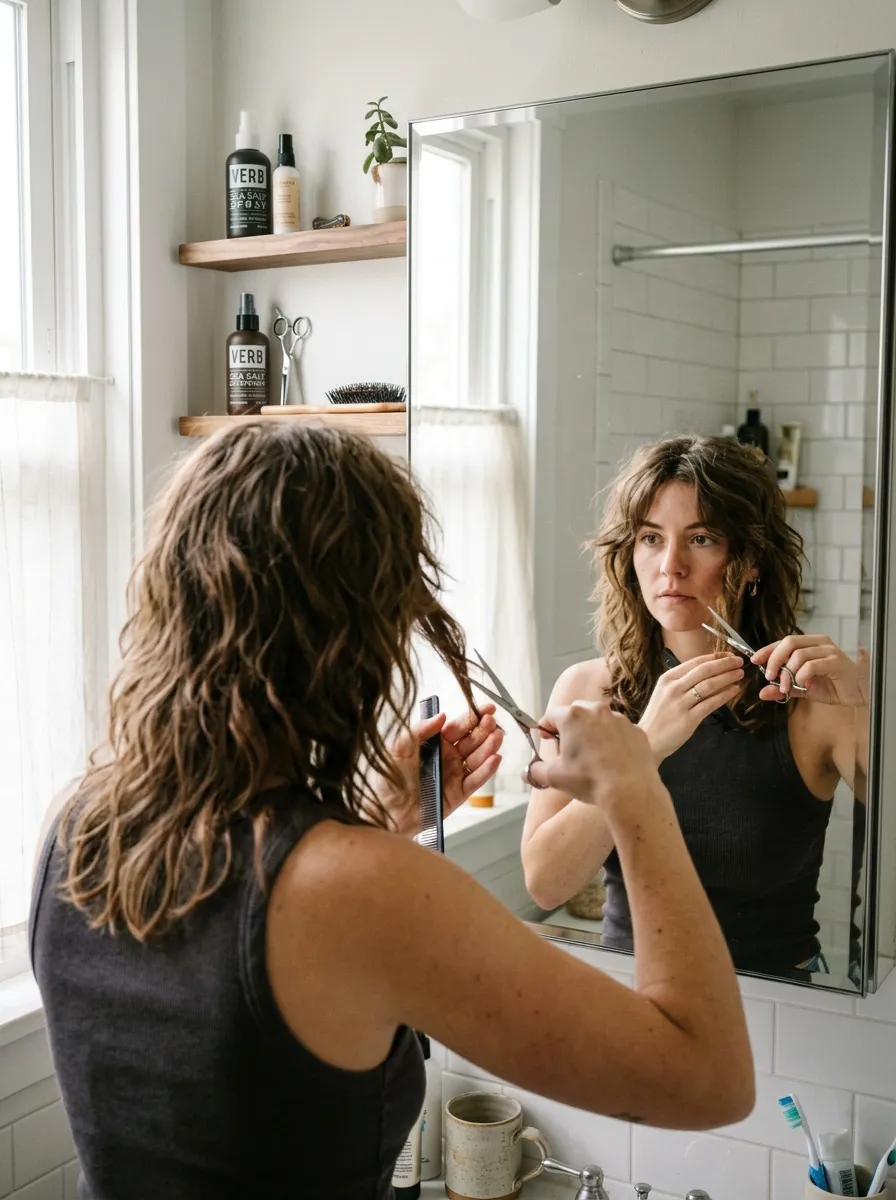
Stretching time between professional cuts is possible with a few careful at-home techniques. Start by twisting small sections of hair and snipping only the very ends that stick out, a method that targets split ends without risking an uneven cut. Always cut less than you think you need since hair doesn’t grow back overnight if you make a mistake. Point cutting, where scissors are angled upward into the ends rather than straight across, softens the line and mimics a professional finish. A sharp pair of hair-cutting shears, kept only for hair, makes a real difference in clean results compared to regular scissors. Budget tip: a decent pair of shears is a one-time cost that pays off over many trims, unlike paying for a professional cut every few weeks purely for shape maintenance. Work in a well-lit bathroom with two mirrors for the back sections, and take your time. Small, careful snips beat one big cut every time when you’re doing this yourself.
Conclusion
The gypsy shag earns its popularity because it works with your hair instead of against it. Curly, straight, thick, or fine, there’s a version of this cut suited to your texture and your schedule. Many of the styling techniques above rely on tools and products you likely already own, and the ones you don’t need cost very little to add to your routine. Trims can stretch further than you’d expect, color can be added in small, affordable doses, and daily styling often takes just minutes once the layers are cut correctly. Pick one or two ideas from this list, bring reference photos to your next salon visit, or grab your shears and try a small at-home touch-up between appointments. The shag rewards experimentation, so use these ideas as a starting point and adjust until you land on the version that fits your hair and your life best.
Leave a Reply